Music 2020. Wrapped.

Everyone and their dog is posting their Spotify Wrapped thing. It’s 2020, i still don’t have Spotify, but despite my increasing age, I still listen to a ton of music.

When I started to work remotely back in 2018, one of the biggest perks for me was – apart from not having to commute – to be able to listen to whatever thing I currently like as loud as I want without headphones. Well, that changed a bit during the course of the COVID-19 pandemic as my wife is now working remotely as well, but alas, it turned out, the volume knob is still working.

So, no Spotify for me. But let’s see what the MariaDB – the database powering the scrobble engine running for dailyfratze.de is up to. How do I fill this data? I have a custom iTunes script written ages ago that calls a REST endpoint with the stuff I’m listening. Pretty basic, actually.

I am working for Neo4j now since 2.5 years and I honestly love the company for manifold reasons. However, it seems that it is considered rude to post SQL in the company Slack and we should prefer to use only Cypher 😉 Well, this post will contain a lot of SQL and use the scheme I had a couple of times in this SQL talk of mine.

Interested in Cypher? Cypher is a language for querying Neo4j, the Graph database by the vendor of the same name,

You can do awesome stuff with Cypher and you’ll find talks by me as well about that topic, but today I’ll keep it to a 1990’s joke: MATCH (n) RETURN n SKIP $no LIMIT /* no */ $ /* no */ limit 😉

General database stats

39497 tracks by 9661 artists and 161141 played tracks by 9 different users. First plays stored April 27 in 2005.

We will make use of the rank function to compute the exact position of things we are interested in.

Top 10 tracks in 2020

A simple approach without rank would be something like this:

SELECT a.artist,
       t.name,
       COUNT(*)
FROM plays p
JOIN tracks t ON t.id = p.track_id
JOIN artists a ON a.id = t.artist_id
WHERE p.user_id = 1
AND YEAR(p.played_on) = 2020
GROUP BY a.artist, t.name
ORDER BY COUNT(*) DESC
LIMIT 10

but that would fill already several places with tracks that have the same absolute count. This is where the rank() and dense_rank() functions come into play.

Both functions assign rows in a row set a rank based on their given order. Both functions can do this over partitions or windows over the whole data. Therefore these analytics functions are often called window functions. Both variants of rank functions assigns the same rank to rows having the same value. Thus, two tracks that have been played the same number of time will receive the same rank. However, rank will skip n ranks if there are 1 + n items in a rank wheres the dense_rank function will not. I want consecutive ranks, that is: All tracks played the most n times will be 1 first place, the next rank second and so forth.

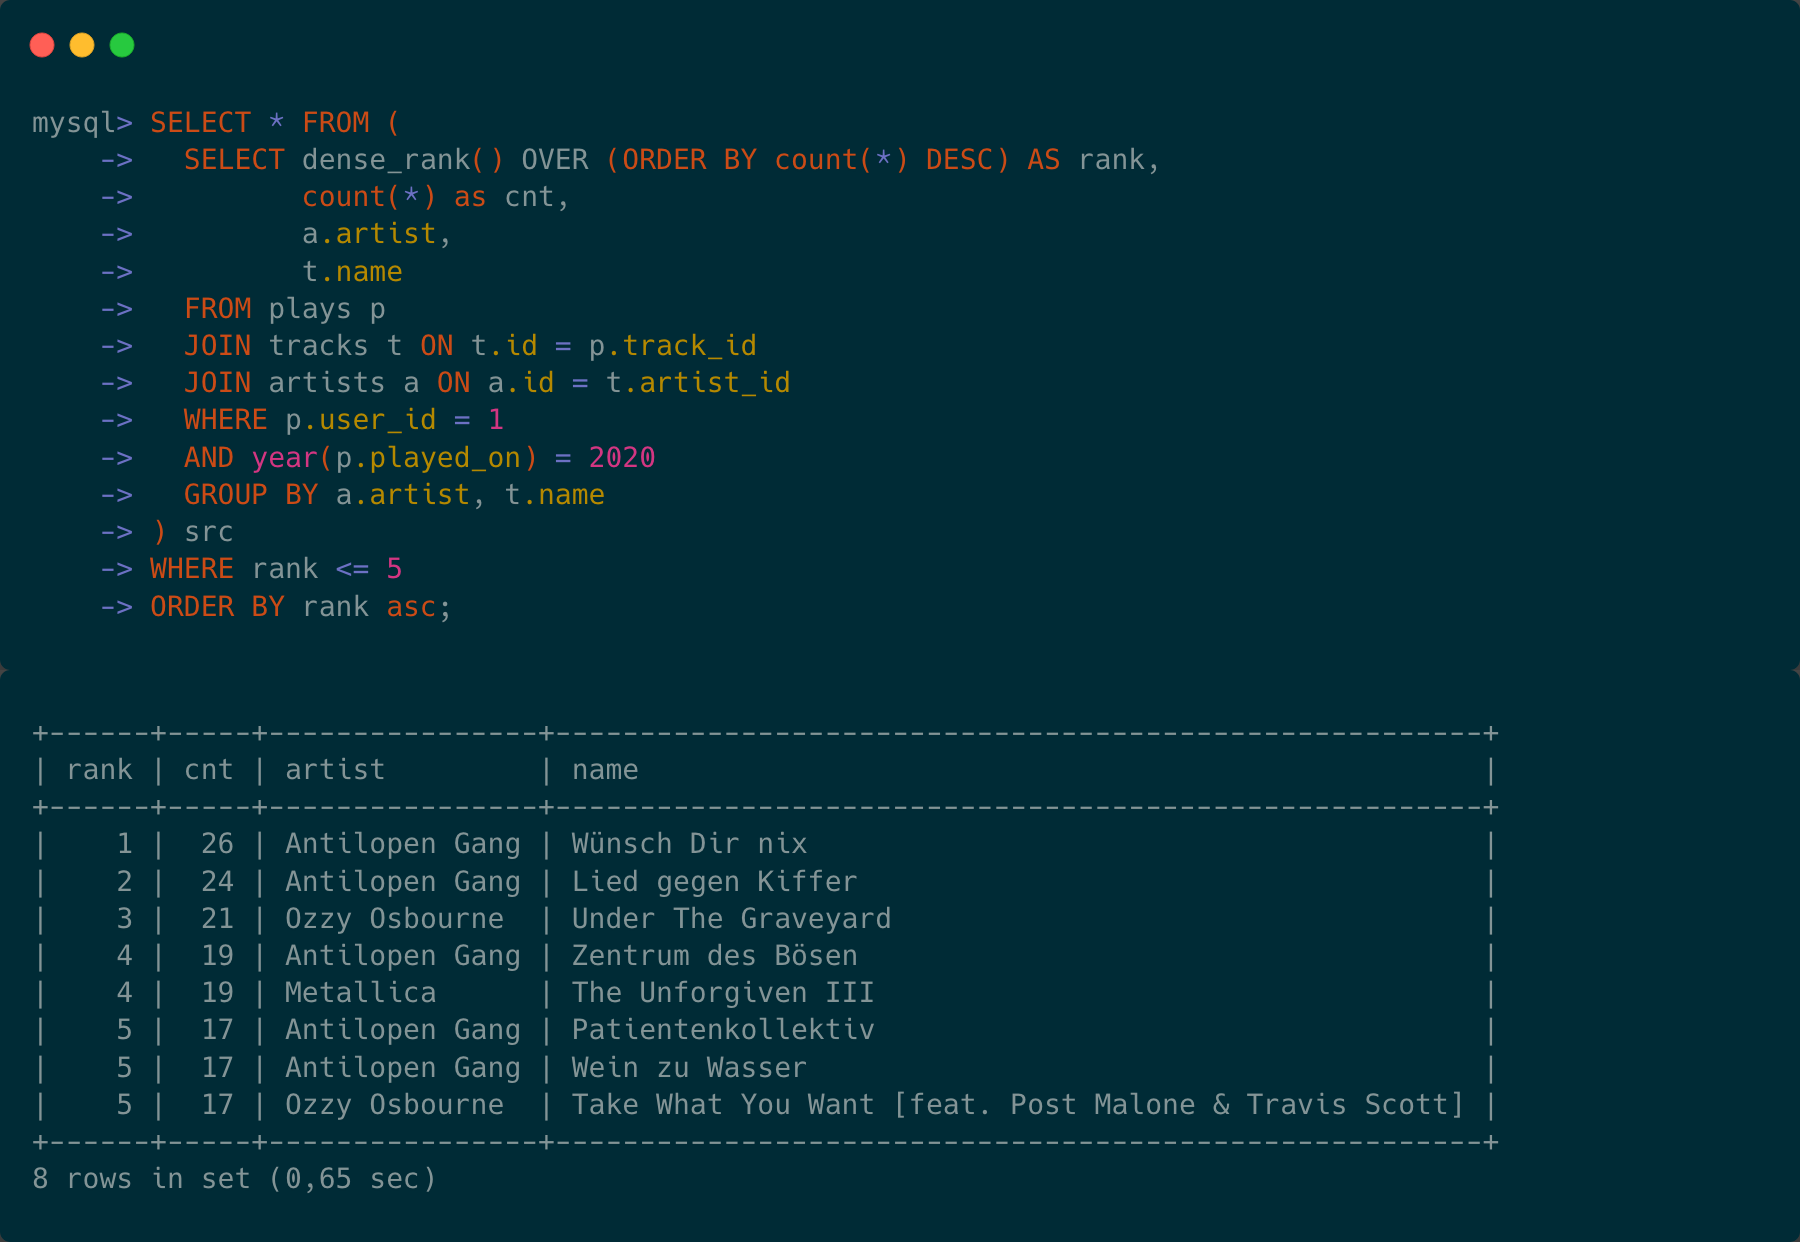
Let’s give it a shot. We see that the a query creating a window function over the dense rank of count gives us 8 tracks in total when I ask for the top 5 places:


And what can I say: German Hip-Hop/Punk-Band Antilopen Gang is on my radar now for 2 years, but in 2020, they have become my meds and therapy. If you would have ever told me, that I would totally fall in love with German Hip-Hop in my early 40ties, I would have said you’re mad, but there we are: “Wünsch Dir nix”, so fitting for 2020:

Also in the top 5, Patientenkollektiv. Such goose bumps:

We will see the Antilopen later on. I was a bit surprised by S&M2, a new album in 2020. A retake of Metallicas symphonic metal approach with the San Francisco Symphony orchestra. That version of The Unforgiven III is not something I would have ever expected by James. An incredible performance:

Last but not least: Ozzy Osborne. This guy has reached Lemmy Kilmister undying level.

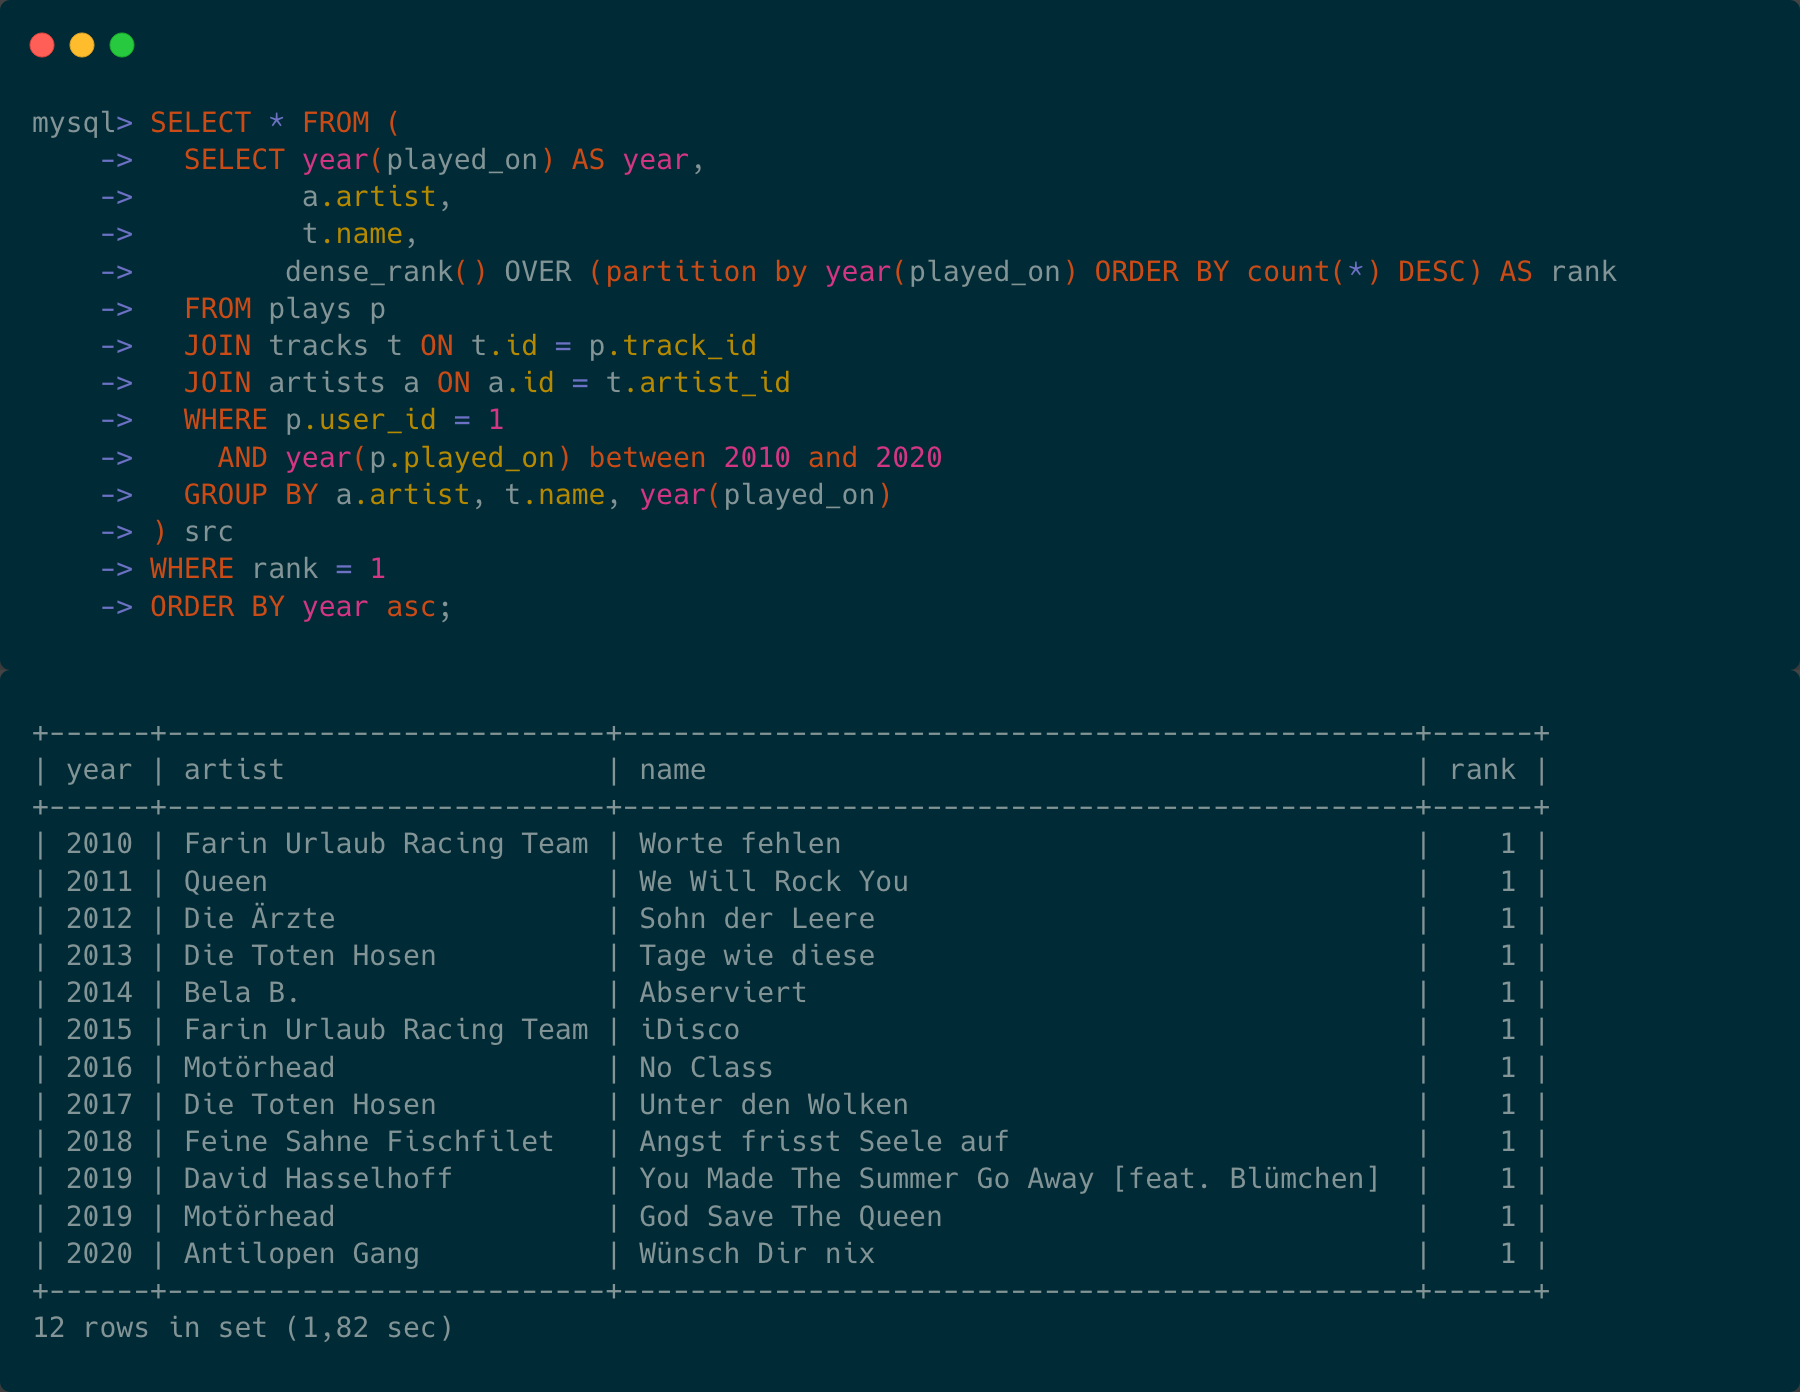
Back to SQL. There are no partitions in the above query. The partitions would come in handy if would like to see my top 1 track over the last years in one query. Let’s give it a try:


It’s basically the same query but notice now how I create the rank: dense_rank() OVER (partition by year(played_on) ORDER BY count(*) DESC) AS rank. The rank is computed now for each year in which I played tracks, separately.

But wait, 2019. What did I drink?

Albums

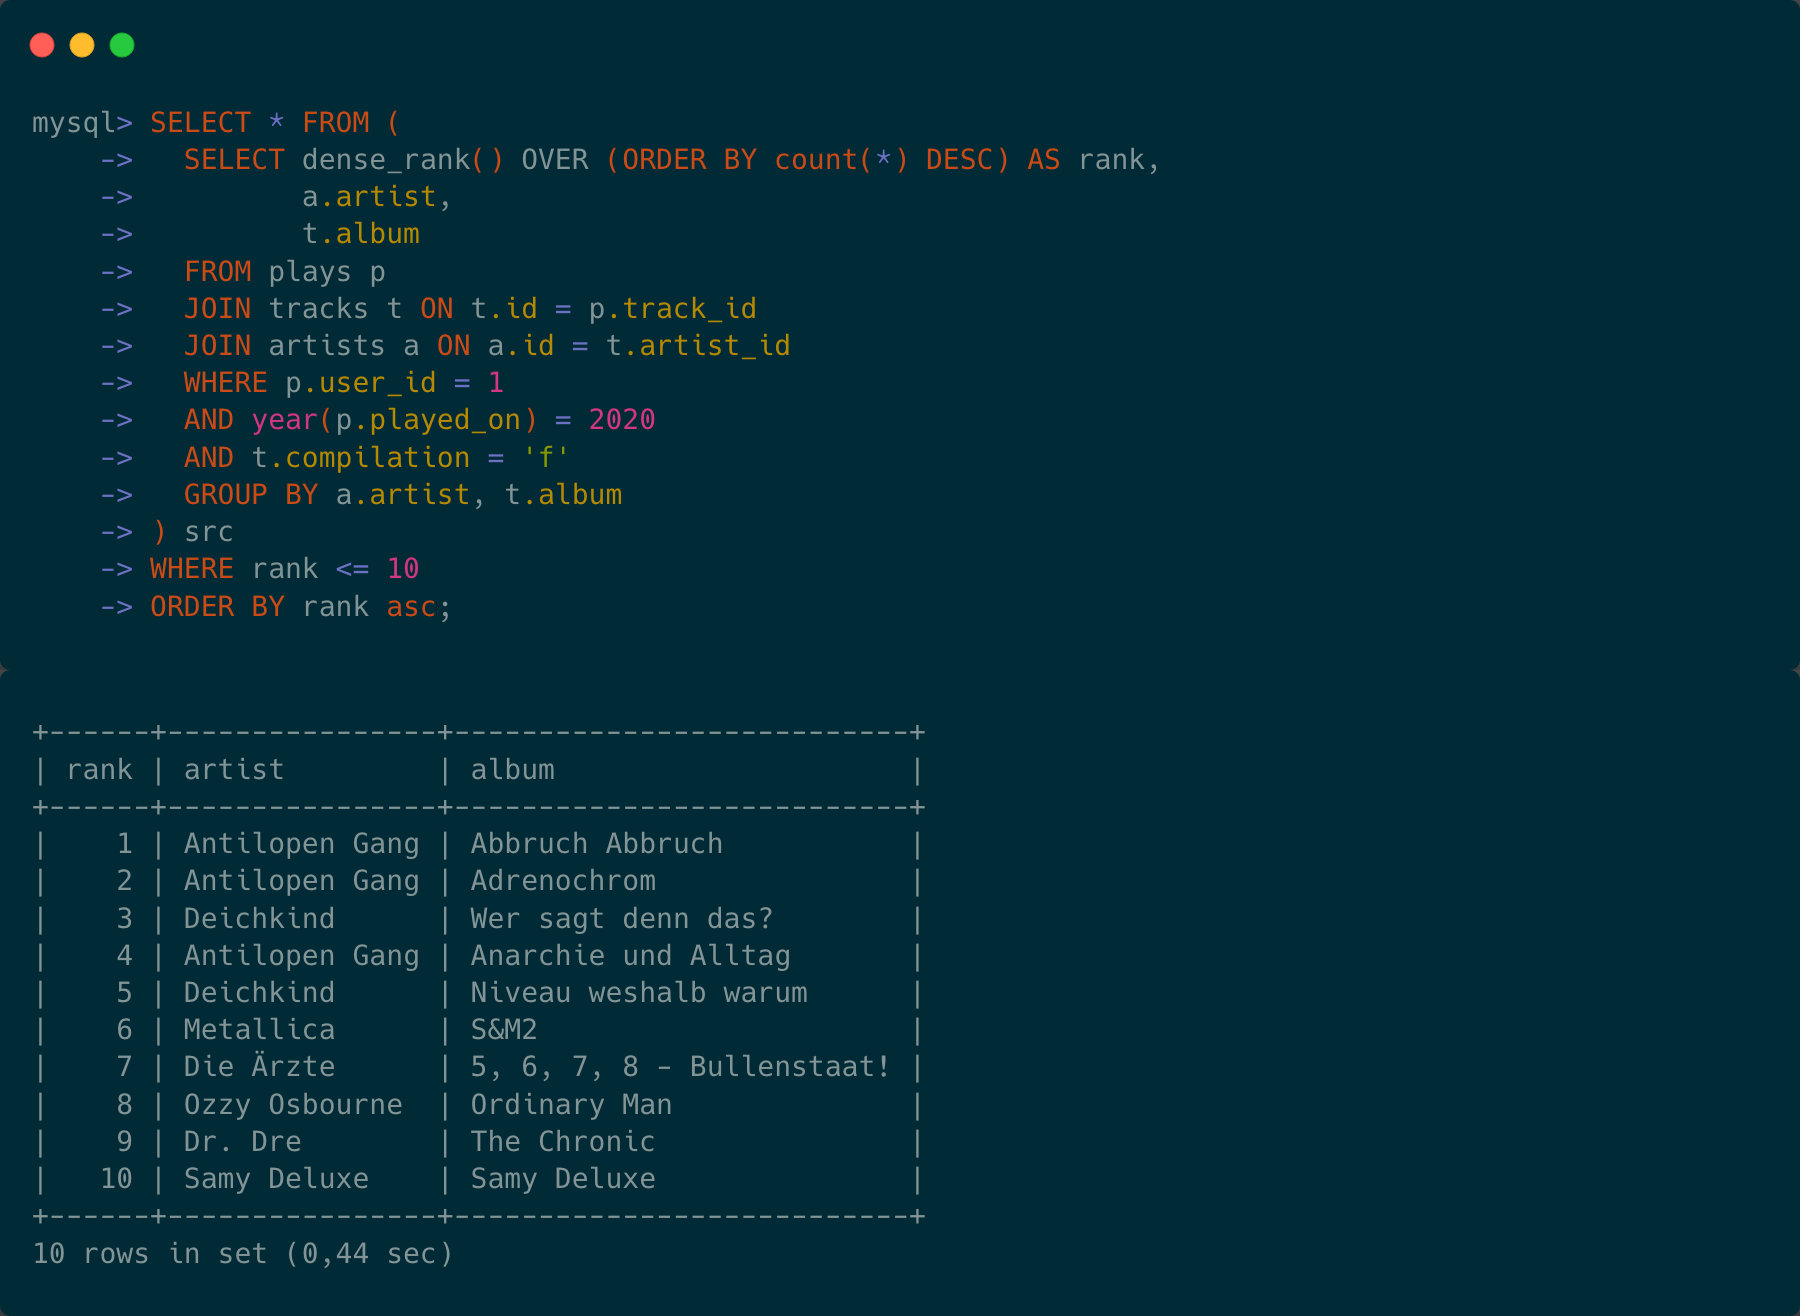
Let’s be safe and let us aggregate that stuff. Yes, I do still listen to whole albums. It is basically the same query, but group by album, not by single tracks. And I excluded compilations. Apart from that, the query is hardly different:


Antilopen Gang with 3 albums. Holy crap. But yes, they did release two albums in 2020, “Abbruch Abbruch” and “Adrenochrom”. The later a reply to some people in the music circus going lunatic and believing a lot of shit. I haven’t heard one album in the last 10 years so often like this. It is streamable on all major platforms.

Let’s play “Dinge” from Deichkinds “Wer sagt denn das?”:

For me 2020 proved that I don’t need too many things. Some stuff is essential for me: Feeling secure and snug with my family, working in a good company that also makes me feel safe. Ok, bicycles are my personal issue, but that’s a different topic…

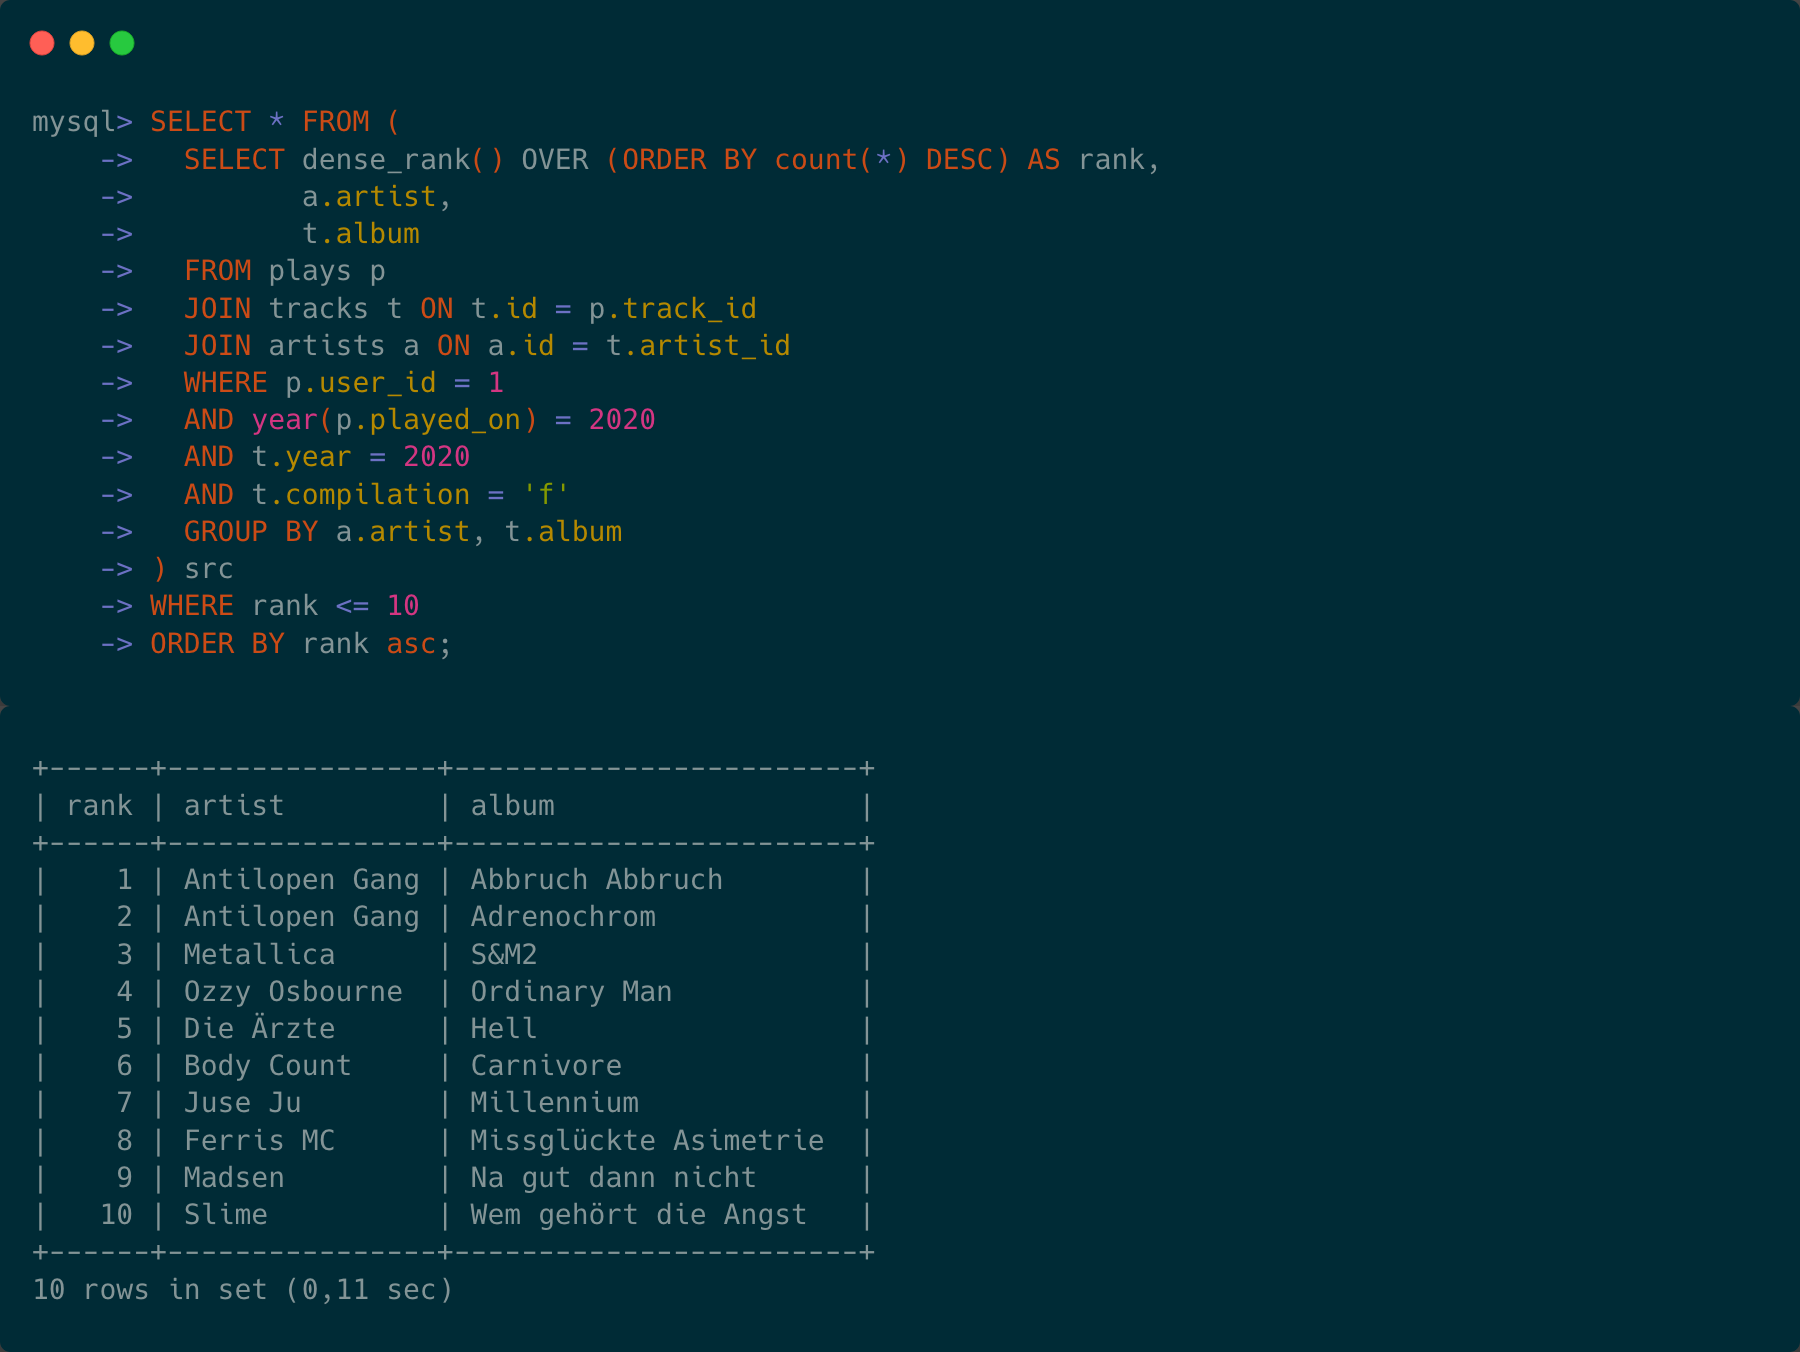
Back to Deichkind: Electropunk. Punk is a good keyword, but I only spot “5, 6, 7, 8 Bullenstaat” by Die Ärzte in the above list. 2020 had some more punk. Let’s filter the above list to albums that have been released in 2020:


And we will see Madsen, Ferris MC and Slime. Madsen, a “Deutsch Rock” band released the Punk Rock Album of 2020 (which is 200% more Punk than Die Ärzte these days), and Ferris MC, who played for a decade with Deichkind, joined forces with Swiss und die anderen and dropped an incredible Rap-Punk-Rock piece. Slime are Slime. The subtitle of this blog, “120 Dezibel” are a quote from “Missglückte Asimetrie” and one reason I will have always music in my life:

Ich dreh auf und die Erde steht still bei 120 Dezibel
Alles was ich brauch und will sind 120 Dezibel
Ich kann euch alle nicht mehr hören bei 120 Dezibel
Nichts was mich noch stört bei 120 Dezibel
120 Dezibel
120 Dezibel

Let’s have a look at Madsen. They got some stand-ins for “Alte weiße Männer”:

And one of our favorite songs among the adults and kids, “Quarantäne für immer”

Listen to “Sorry, kein Sorry” by Ferris. After that, give it a go with Slime. That band is as old as me:

And back to the database and the

Artists

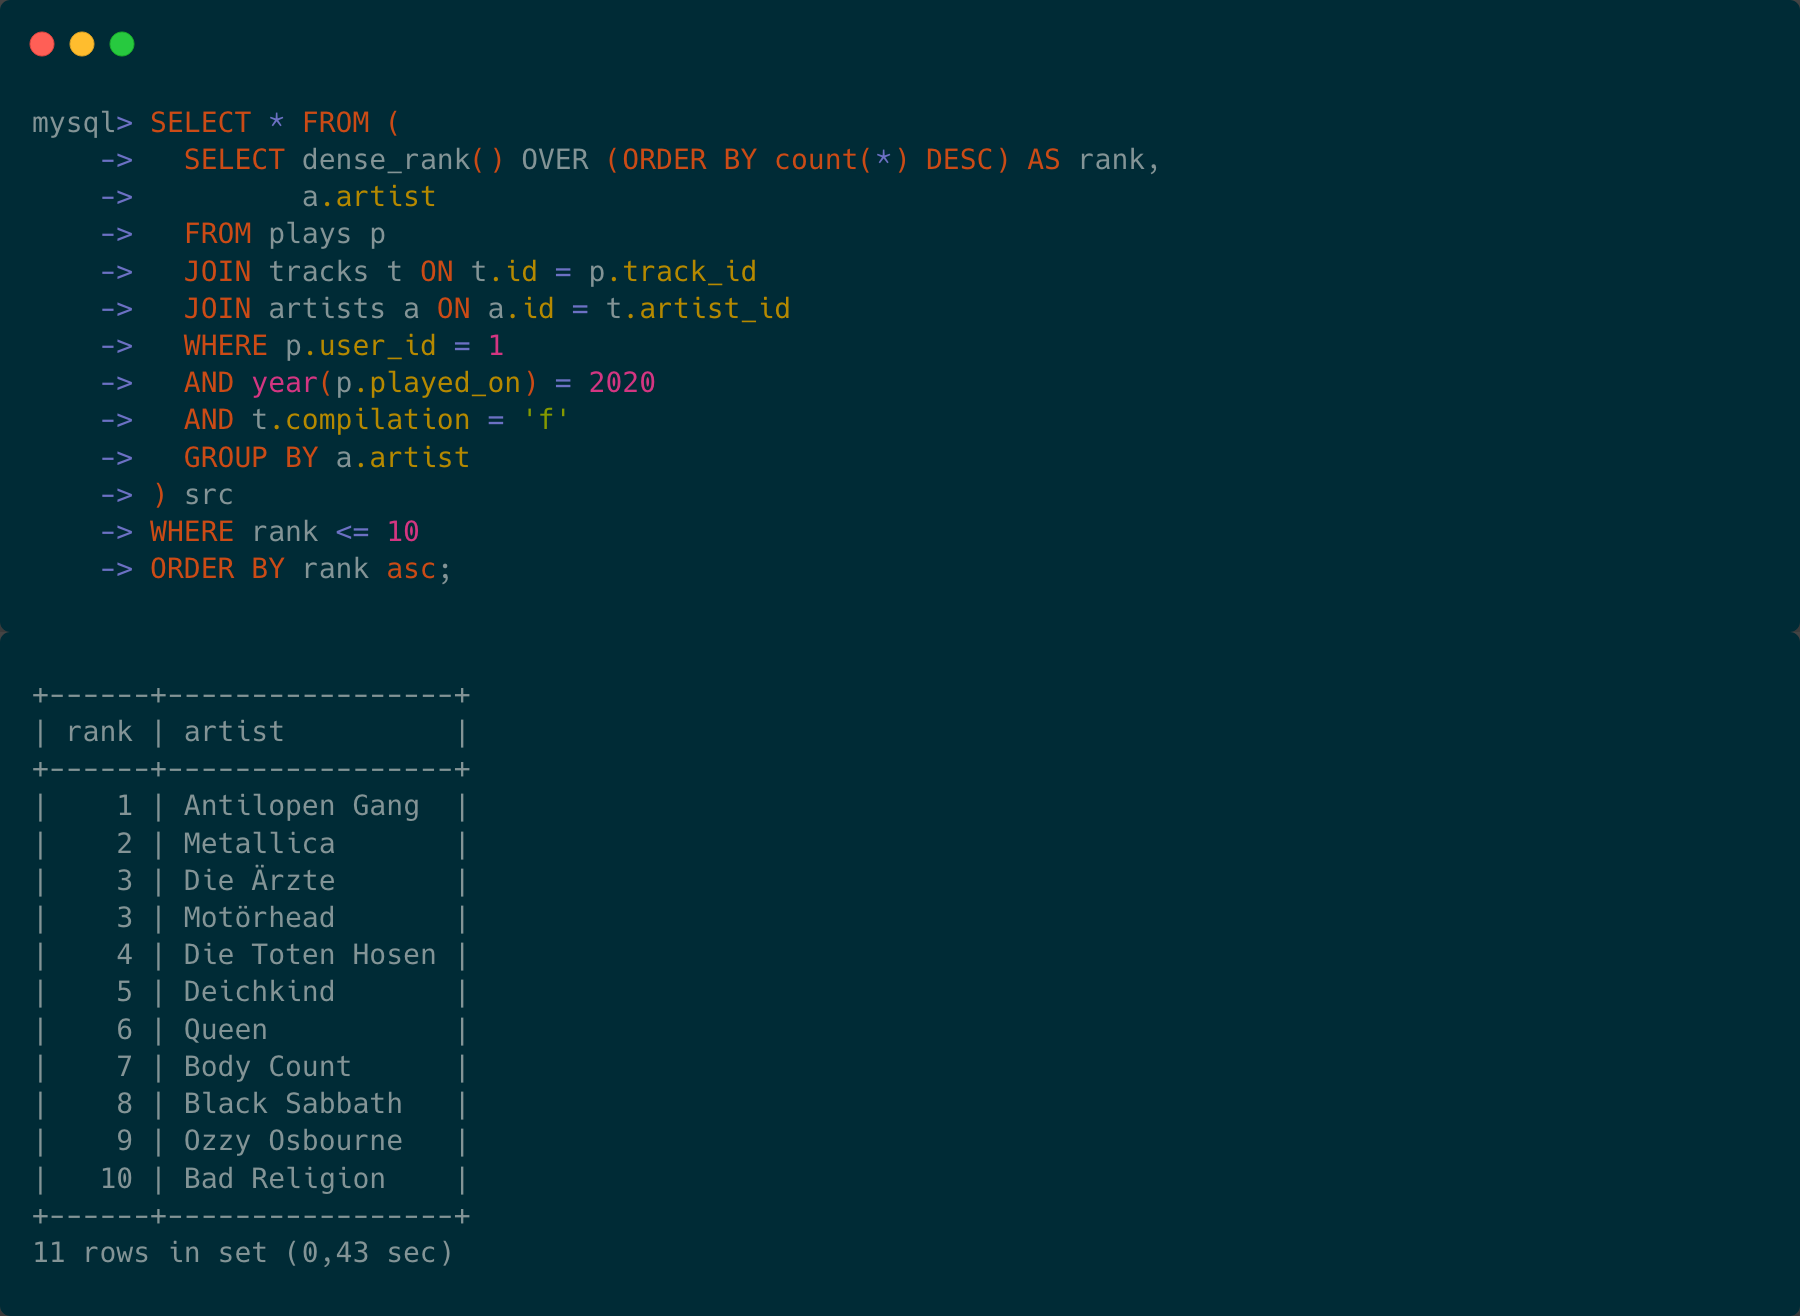
What have been my preferred artists in 2020? I expect no surprises here. The query will be very similar to before, only the grouping changes again (it becomes simpler):


We see again Antilopen Gang and on the next two ranks – if I didn’t restrict to top 10 – we would have seen Juse Ju and Fatoni, two more German rapper who are also somewhere near Antilopen Gang. A graph database like Neo4j would show this connection and probably discover the “Anti Alles Aktion” on it’s own. Want to learn how? Have a look at Going from relational databases to databases with relations with Neo4j.

People who know me a bit longer know that I have been to more than one Heavy Metal festival and certainly to more than one Grindcore gig. That much German hip-hop in my playlists? I would have never thought. Ok, there’s still the usual suspects like Motörhead (I love running with Motörhead in my ears), the mighty Black Sabbath and even Body Count had a decent album out this year.

Can my database answer the change in artist or preference as well? Hmm, we would need the current years rank of something and the previous one. I think we can do this.

But in the meantime, enjoy Faith Alone 2020 by Bad Religion:

So be prepared for the with-with clause or “Common Table Expression”. The keen eye did already see that I used subqueries in my queries above. Why? To filter on the rank (top 5 or top 10 only). I cannot do this in the same select as in which the rank is computed. Therefore I nested the query and made it accessible that way.

The subquery works, but is kinda hard to read and cannot be reused. A relation inside a with clause is somewhat like a named subquery or a view that only exists during that query. Fun fact: CTEs can refer to themselves, thus become recursive.

Anyway, I think they read nice and reminds me a lot of the with clause in Cypher which is used to stick together multiple segments of a query to one pipeline.

But show me the code:

WITH rank_per_year AS (
  SELECT YEAR(p.played_on)  AS YEAR,
         a.artist,
         dense_rank() OVER (partition BY YEAR(played_on) ORDER BY COUNT(*) DESC) AS rank
  FROM plays p
  JOIN tracks t ON t.id = p.track_id
  JOIN artists a ON a.id = t.artist_id
  WHERE p.user_id = 1
  AND YEAR(p.played_on) BETWEEN 2015 AND  2020
  AND t.compilation = 'f'
  GROUP BY YEAR(p.played_on), a.artist
) 
SELECT YEAR, artist, rank, 
       ifnull(
         lag(rank) OVER (partition BY artist ORDER BY YEAR ASC) - rank, 
         'new'
       )  AS `change`
FROM rank_per_year
WHERE rank <= 5
ORDER BY YEAR ASC, rank ASC;

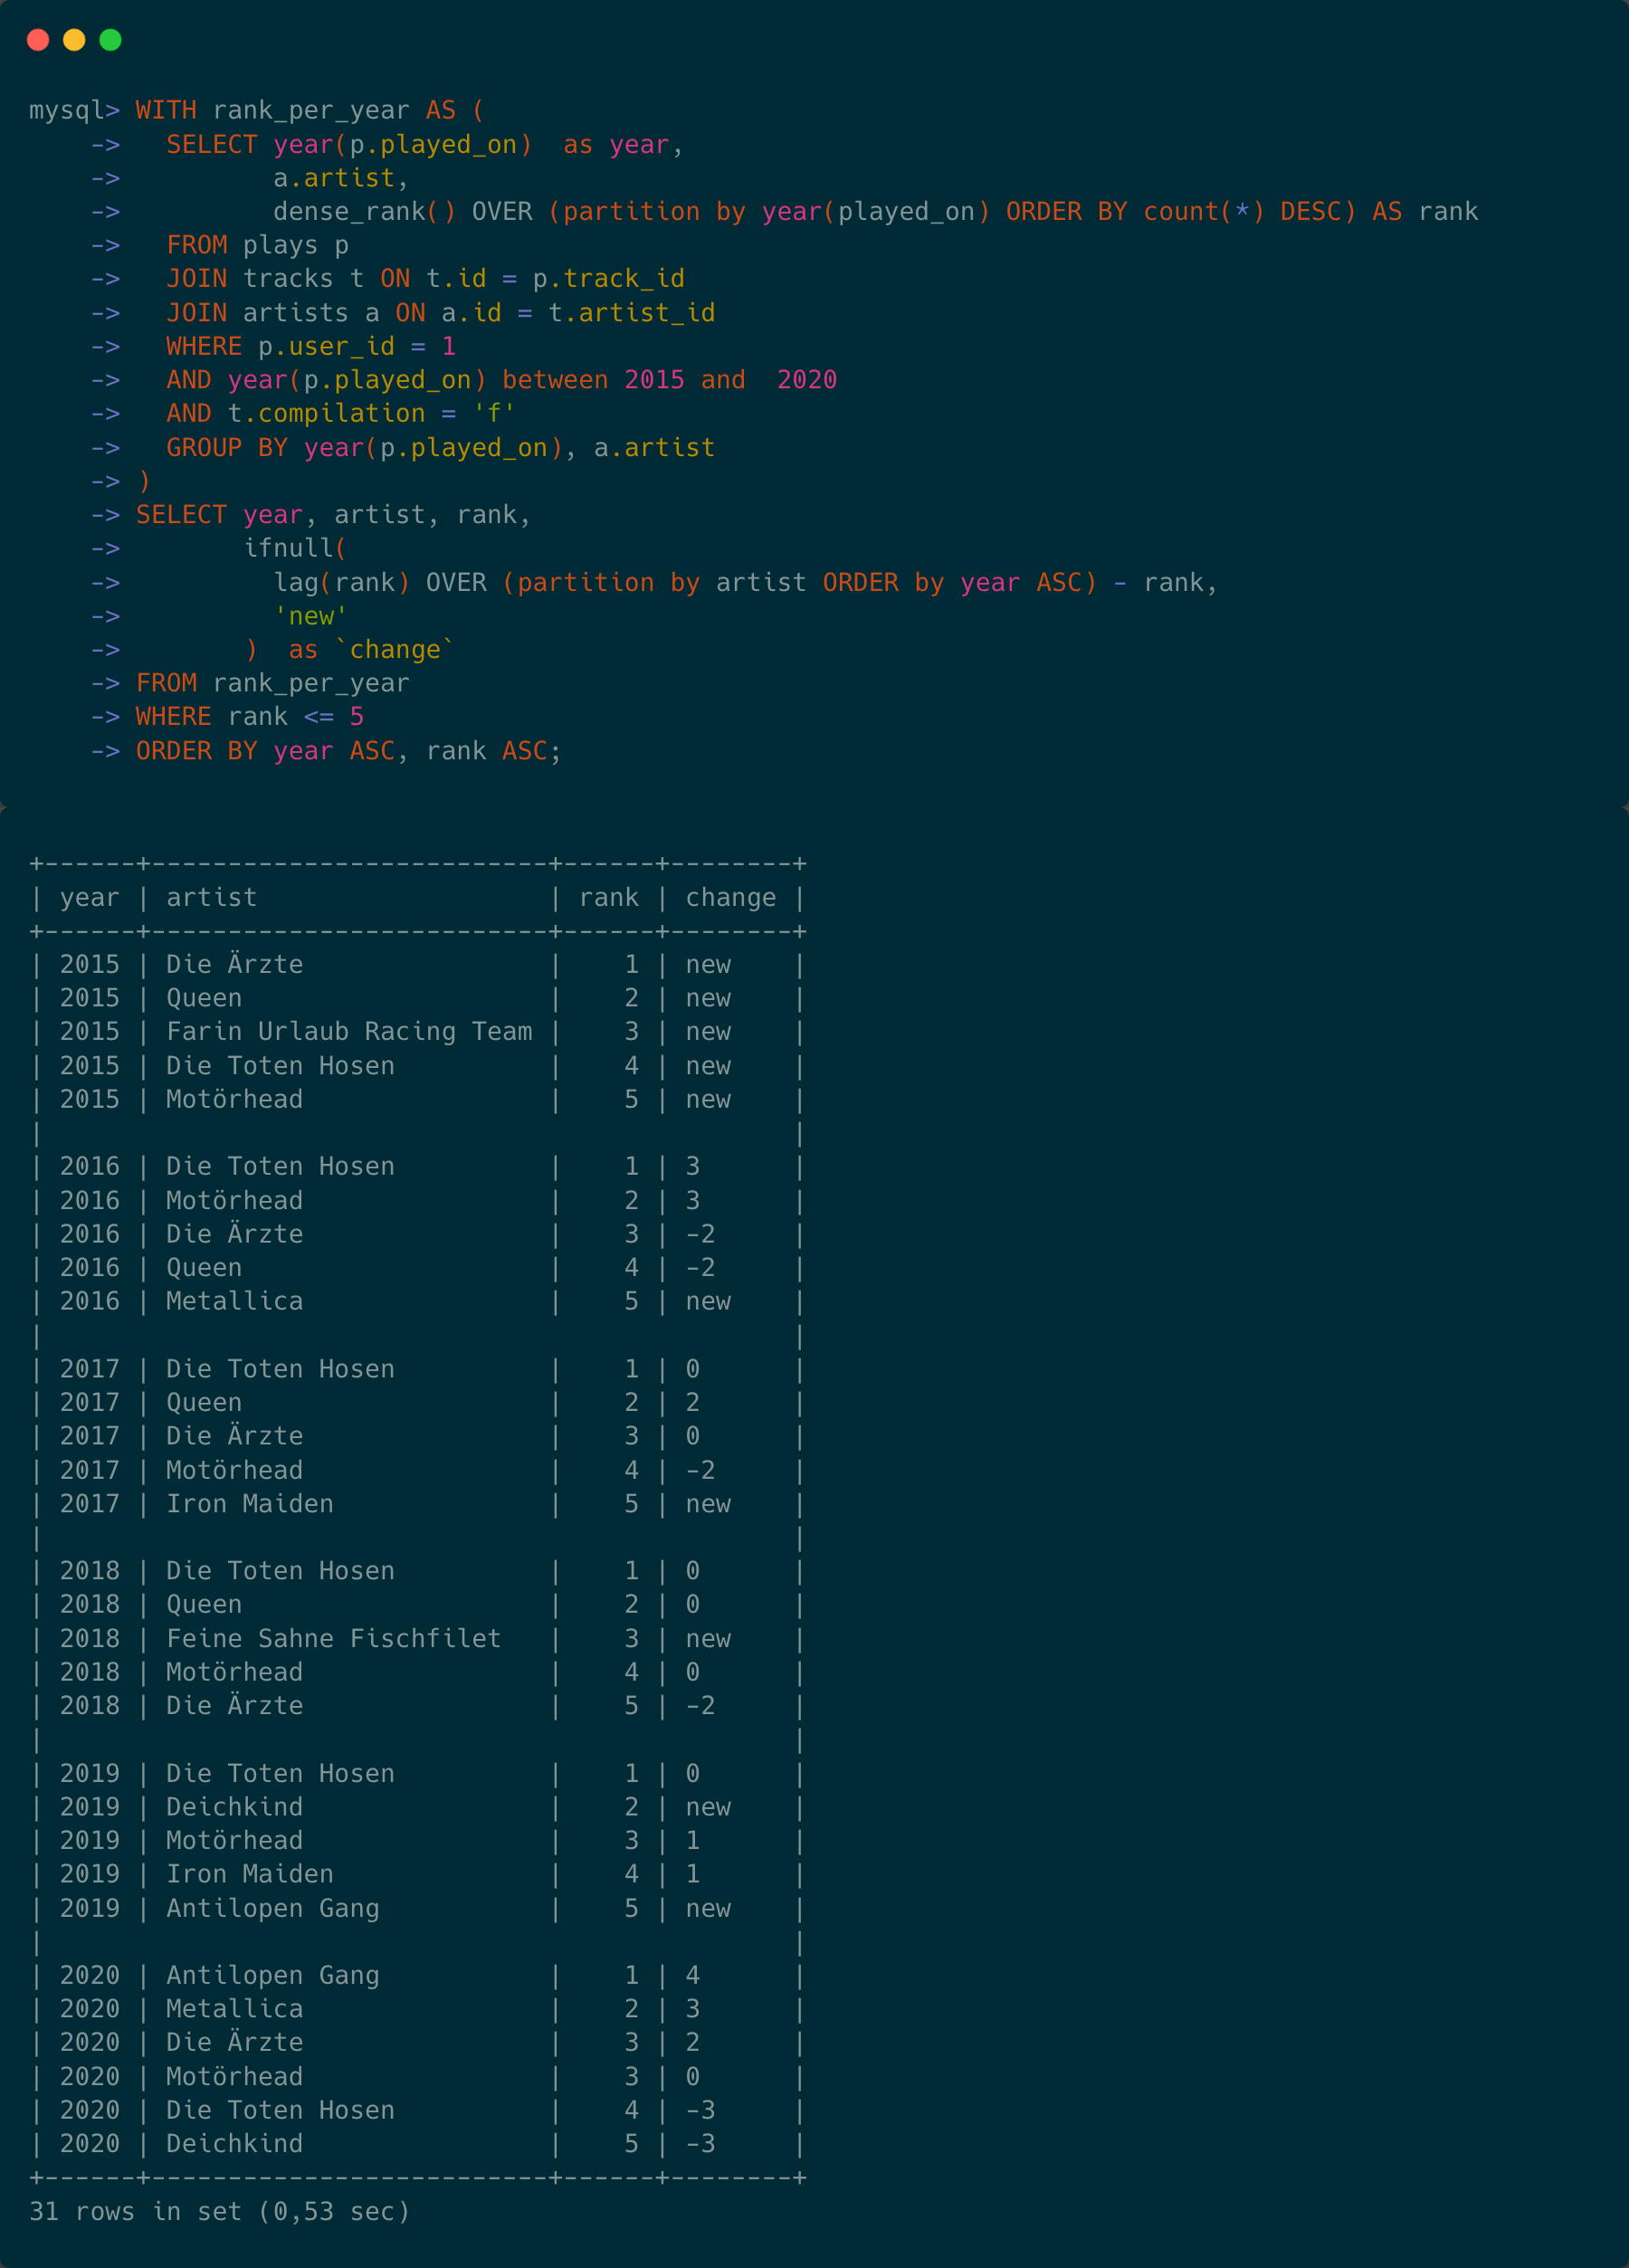
We do compute the rank per year and artist (“group by year and artist”) for years 2015 to 2020, partitioned by the year and give this whole thing a name (“rank_per_year”). This is a new relation that can now be used in a select clause, like we do.

In that select clause, we do find lag. lag is a window function that can go n rows backward over a partition that is ordered. The partition here is defined by the artist and in that, ordered by year. lag picks the value of the rank of the previous year. rank is a variable in that case, coming from the CTE named “rank_per_year”, not from the window function of the same name!

From that lagged value we subtract the current and get the change from the previous to this year. As one artist can be under the top 5 artist for the first time in a year, we need to check whether the previous rank is null. That’s what ifnull is for. Neat, isn’t it? And the result? Here we go (I added some blank lines manually):


I hope you enjoyed this a bit. At least I did. Was nice doing some SQL again and digging through the stuff I have been listening in 2020. In total I listend to about 9847 tracks so far in 2020 with a duration of roughly 27 days.

I leave you with a track that captures my mood in 2020 all to perfect. Danger Dan mit Nudeln und Klopapier:

The screenshots of the code have been created with Carbon. I was too lazy to fiddle around with something else that would have fit both the queries and the output. I generated the query format with window chrome and the output without and appended both files than with ImageMagick like this: convert carbon.png carbon\(1\).png -append tracks-2020.png.

| Comments (0) »

05-Dec-20


About the tooling available to create native GraalVM images.

A couple of days ago I sent out this tweet here:

This tweet caused quite some reaction and with the following piece I want to clarify my train of thoughts behind it. First of all, let’s pick the components here and explain what they are.

The complete source code for all examples is on GitHub: michael-simons/native-story. Title image is from Alexander. Cheers, hugs and thank you to Gerrit, Michael and Gunnar for your reviews, proofreading and feedback.

GraalVM

GraalVM is a high-performance runtime that provides significant improvements in application performance and efficiency which is ideal for microservices. Quoted from the GraalVM website:

“GraalVM is a high-performance runtime that provides significant improvements in application performance and efficiency which is ideal for microservices. It is designed for applications written in Java, JavaScript, LLVM-based languages.”

One benefit of the GraalVM is a new just-in-time compilation mechanism, which makes many scenarios running on GraalVM faster than running on a comparable JDK. However, there is more. Also quoting from the above intro: “For existing Java applications, GraalVM can provide benefits by […] creating ahead-of-time compiled native images.”

SubstrateVM

The SubstrateVM is the part of GraalVM that is responsible for running the native image. The readme states:

(A native image) does not run on the Java VM, but includes necessary components like memory management and thread scheduling from a different virtual machine, called “Substrate VM”. Substrate VM is the name for the runtime components (like the deoptimizer, garbage collector, thread scheduling etc.). The resulting program has faster startup time and lower runtime memory overhead compared to a Java VM.

The GraalVM team has a couple of benchmarks showing the benefits from running microservices as native images.
Those numbers are impressing, no doubt, and they will have a positive effect for many applications.

I wrote my sentiment not as an author of applications, but as an author and contributor of database drivers supporting encrypted connections to servers as well as an object mapping framework that takes arbitrary domain objects (in form of whatever classes people can think of) and creates instances of those dynamically from database queries and vice versa.

This text is not an exhaustive take on the GraalVM and its fantastic tooling. It’s a collections of things I learned during making the Neo4j Java Driver, the Quarkus Neo4j extension, Spring Data Neo4j 6 and some GraalVM polyglot examples native image compatible.

Since my first ever encounter with GraalVM back in 2017 at JCrete, things have become rather easy for application developers. There is the native-image tool that takes classes or a whole jar containing a main class or the corresponding Maven plugin and produces a native executable.

There is a great getting started Install GraalVM which you can follow as an application developer step by step. Make sure you install the native-image tool, too.

Giving the following trivial program – which can be run as a single source file java trivial/src/main/java/ac/simons/native_story/trivial/Application.java Michael producing Hello, Michael

package ac.simons.native_story.trivial;
 
public class Application {
 
	public static void main(String... args) {
 
		System.out.println("Hello, " + (args.length == 0 ? "User" : args[0]));
	}
}

Compile this with first with javac and after that, run native-image like this:

javac trivial/src/main/java/ac/simons/native_story/trivial/Application.java 
native-image -cp trivial/src/main/java ac.simons.native_story.trivial.Application app

It will produce some output like this

Build on Server(pid: 21148, port: 50583)
[ac.simons.native_story.trivial.application:21148]    classlist:      71.34 ms,  4.55 GB
[ac.simons.native_story.trivial.application:21148]        (cap):   1,663.79 ms,  4.55 GB
[ac.simons.native_story.trivial.application:21148]        setup:   1,850.67 ms,  4.55 GB
[ac.simons.native_story.trivial.application:21148]     (clinit):     107.06 ms,  4.55 GB
[ac.simons.native_story.trivial.application:21148]   (typeflow):   2,620.63 ms,  4.55 GB
[ac.simons.native_story.trivial.application:21148]    (objects):   3,051.08 ms,  4.55 GB
[ac.simons.native_story.trivial.application:21148]   (features):      83.23 ms,  4.55 GB
[ac.simons.native_story.trivial.application:21148]     analysis:   5,962.31 ms,  4.55 GB
[ac.simons.native_story.trivial.application:21148]     universe:     112.18 ms,  4.55 GB
[ac.simons.native_story.trivial.application:21148]      (parse):     218.57 ms,  4.55 GB
[ac.simons.native_story.trivial.application:21148]     (inline):     494.42 ms,  4.55 GB
[ac.simons.native_story.trivial.application:21148]    (compile):     912.43 ms,  4.43 GB
[ac.simons.native_story.trivial.application:21148]      compile:   1,828.57 ms,  4.43 GB
[ac.simons.native_story.trivial.application:21148]        image:     465.08 ms,  4.43 GB
[ac.simons.native_story.trivial.application:21148]        write:     135.90 ms,  4.43 GB
[ac.simons.native_story.trivial.application:21148]      [total]:  10,465.92 ms,  4.43 GB

and eventually you can run a native executable like this ./app Michael. Adding the corresponding Maven plugins to the project makes that part of the build. Pretty neat.

So far, so good and done? From this application, of course. But having framework needs is a bit more elaborated.

A fictive “framework”

Let’s take this simple “hello-world” application and turn it into something artificially complicated. Imagine we are writing a complex application, having some framework like traits. So, the “greeting” must be turned into an interface based service:

public interface Service {
 
	String sayHelloTo(String name);
 
	String getGreetingFromResource();
}

Of course, we need a factory to get instances of that service

public class ServiceFactory {
 
	public Service getService() {
		Class<Service> aClass;
		try {
			aClass = (Class<Service>) Class.forName(ServiceImpl.class.getName());
			return aClass.getConstructor().newInstance();
		} catch (Exception e) {
			throw new RuntimeException(\\_(ツ)_/¯", e);
		}
	}
}

The implementation of the service should look something like this

import java.io.BufferedReader;
import java.io.IOException;
import java.io.InputStreamReader;
import java.io.UncheckedIOException;
import java.util.stream.Collectors;
 
public class ServiceImpl implements Service {
 
	private final TimeService timeService = new TimeService();
 
	@Override
	public String sayHelloTo(String name) {
		return "Hello " + name + " from ServiceImpl at " + timeService.getStartupTime();
	}
 
	@Override
	public String getGreetingFromResource() {
		try (BufferedReader reader = new BufferedReader(
			new InputStreamReader(this.getClass().getResourceAsStream("/content/greeting.txt")))) {
 
			return reader.lines()
				.collect(Collectors.joining(System.lineSeparator()));
		} catch (IOException e) {
			throw new UncheckedIOException(e);
		}
	}
}

That looks actually rather simple. As an added bonus, it includes a TimeService that returns the start of the application. That service is implemented in a super naive way:

import java.time.Instant;
 
public class TimeService {
 
	private final static Instant STARTED_AT = Instant.now();
 
	public Instant getStartupTime() {
		return STARTED_AT;
	}
}

It’s problematic on its own, but that shall not be the point here. Last but not least, let’s blow up the application itself a bit:

import java.lang.reflect.Method;
 
public class Application {
 
	public static void main(String... a) {
 
		Service service = new ServiceFactory().getService();
		System.out.println(service.sayHelloTo("GraalVM"));
 
		System.out.println(invokeGreetingFromResource(service, "getGreetingFromResource"));
	}
 
	static String invokeGreetingFromResource(Service service, String theName) {
 
		try {
			Method method = Service.class.getMethod(theName);
			return (String) method.invoke(service);
		} catch (Exception e) {
			throw new RuntimeException(e);
		}
	}
}

I tried to make up some examples that need to be addressed due to limitations of Graals ahead of time compilation described here.

What do we have?

  • A factory producing an instance based on a dynamic class name (non compile time constant), the ServiceFactory
  • A dynamic method call (could be a field call or whatever through java.lang.reflect in Application)
  • A service that uses some resources (getGreetingFromResource).
  • Another service that uses a static field initialized during class initialization containing a sensible value dependent on the current time (TimeService)

When I package this application as a jar file, containing a manifest entry pointing to the main class, I can run it like this:

java -jar only-on-jvm/target/only-on-jvm-1.0-SNAPSHOT.jar 
Hello GraalVM from ServiceImpl at 2020-09-15T09:37:37.832141Z
Hello, from a resource.

However, pointing native-image to it, now results in a couple of warnings

native-image -jar only-on-jvm/target/only-on-jvm-1.0-SNAPSHOT.jar 
...
Warning: Reflection method java.lang.Class.forName invoked at ac.simons.native_story.ServiceFactory.getService(ServiceFactory.java:8)
Warning: Reflection method java.lang.Class.getMethod invoked at ac.simons.native_story.Application.invokeGreetingFromResource(Application.java:18)
Warning: Reflection method java.lang.Class.getConstructor invoked at ac.simons.native_story.ServiceFactory.getService(ServiceFactory.java:9)
Warning: Aborting stand-alone image build due to reflection use without configuration.
Warning: Use -H:+ReportExceptionStackTraces to print stacktrace of underlying exception
Build on Server(pid: 26437, port: 61293)
...
Warning: Image 'only-on-jvm-1.0-SNAPSHOT' is a fallback image that requires a JDK for execution (use --no-fallback to suppress fallback image generation and to print more detailed information why a fallback image was necessary).

A fallback image that requires a JDK means that the resulting image – however not being much smaller or larger than a non-fallback – requires the JDK to be present at runtime. If you remove the JDK from your path and try to execute it, it will greet you with:

./only-on-jvm-1.0-SNAPSHOT 
Error: No bin/java and no environment variable JAVA_HOME

What tools are available to address the issues? Let’s first tackle the first two, both dynamic class loading and Java reflection. We have two options:

We can enumerate what classes need to be present in the native image and what methods as well and to which methods reflection based access should be available. Or we can substitute classes or methods when run on GraalVM.

Enumerating things present in the native image

The GraalVM analysis intercepts calls like the one to Class.forName and tries to reduce their arguments to a compile time constant. If this succeeds, the class in question is added to the image. The above example is contrived so that the analysis cannot do this. This is where the “reflection config” can come into place. The native-image tool takes -H:ReflectionConfigurationFiles as arguments which points to JSON files containing something like this:

[
  {
    "name" : "ac.simons.native_story.ServiceImpl",
    "allPublicConstructors" : true
  },
  {
    "name" : "ac.simons.native_story.Service",
    "allPublicMethods" : true
  }
]

Here we declare that we want allow reflective access to all public constructors of ServiceImpl so that we can get an instance of it and allow access to all public methods of the services interface.

There are more options as described here.

One way to make native-image use that config is to pass it as
-H:ReflectionConfigurationFiles=/path/to/reflectconfig, but I prefer having one
native-image.properties in META-INF/native-image/GROUP_ID/ARTIFACT_ID which is picked up by the native-image tool.

That native-image.properties contains so far the following:

Args = -H:ReflectionConfigurationResources=${.}/reflection-config.json

Pointing to the above config.

This will compile the image just nicely. However, it will still fail with a NullPointerException: The greeting.txt resource has not been included in the image.

This can be fixed with a resources-config.json like this

{
  "resources": [
    {
      "pattern": ".*greeting.txt$"
    }
  ]
}

The appropriate stanza needs to be added to the image properties, so that we have now:

Args = -H:ReflectionConfigurationResources=${.}/reflection-config.json \
       -H:ResourceConfigurationResources=${.}/resources-config.json

Note The arguments for specifying configuration in form of some JSON “things” come in two options: As XXXConfigurationResources and XXXConfigurationFiles which I learned in this issue (which is great example of fantastic communication from an OSS project). The resources-form is for everything inside your artifact, the files-form is for external files. The wildcard ${.} resolves accordingly. All the options to specify can be retrieved with something like this: native-image --expert-options | grep Configuration

Now the image runs without errors:

 ./reflection-config-1.0-SNAPSHOT                                                                                          
Hello GraalVM from ServiceImpl at 2020-09-15T15:02:47.572800Z
Hello, from a resource.

But does it run without bugs? Well not exactly. I wrote a bit more text, time went on and when I run it again, it prints the same date. Look back at the TimeService. It holds an instance of private final static Instant STARTED_AT = Instant.now();. It must be initialized before the time service is used.

I’m actually unsure why the native image tool considers the TimeService class as “safe” (described here) and choses to initialize it at build time (which also contradicts Runtime vs Build-Time Initialization stating “Since GraalVM 19.0 all class-initialization code (static initializers and static field initialization)”. At first I thought that happens as I “hide” the TimeServices usage behind my reflection based code, but I can reproduce it without it, too.

At the time of writing, I asked for this on the GraalVM slack and we see how it will be answered. Until then, I’m happy to have a somewhat contrived example. The TimeService must be of course initialized at runtime, it is not safe. This is done via --initialize-at-run-time arguments to the native image tool.

So now we have:

Args = -H:ReflectionConfigurationResources=${.}/reflection-config.json \
       -H:ResourceConfigurationResources=${.}/resources-config.json \
       --initialize-at-run-time=ac.simons.native_story.TimeService

And a correctly working, native binary.

Substitutions

Working on making the Neo4j driver natively compilable was much more effort. We used Netty underneath for SSL connections. A couple of things need to be enabled on the native image tool to get the groundworks running (like having those -H:EnableURLProtocols=http,https --enable-all-security-services -H:+JNI options which can be added in the same manner like we did above).

A couple of other things needed active substitutions.

With the “SVM” project the GraalVM provides a way to substitute whole classes or methods during the image build:

<dependency>
	<groupId>org.graalvm.nativeimage</groupId>
	<artifactId>svm</artifactId>
	<version>${native-image-maven-plugin.version}</version>
	<!-- Provided scope as it is only needed for compiling the SVM substitution classes -->
	<scope>provided</scope>
</dependency>

Now we can provide them like this in a package private class like CustomSubstitutions.java hidden away.

import ac.simons.native_story.Service;
import ac.simons.native_story.ServiceImpl;
 
import com.oracle.svm.core.annotate.Substitute;
import com.oracle.svm.core.annotate.TargetClass;
 
@TargetClass(className = "ac.simons.native_story.ServiceFactory")
final class Target_ac_simons_native_story_ServiceFactory {
 
	@Substitute
	private Service getService() {
		return new ServiceImpl();
	}
}
 
@TargetClass(className = "ac.simons.native_story.Application")
final class Target_ac_simons_native_story_Application {
 
	@Substitute
	private static String invokeGreetingFromResource(Service service, String theName) {
 
		return "#" + theName + " on " + service + " should have been called.";
	}
}
 
 
class CustomSubstitutions {
}

The names of the classes don’t matter, the target classes do of course.

With that, -H:ReflectionConfigurationResources=${.}/reflection-config.json can go away (in our case). You can do a lot of stuff in the substitutions. Have a look at what we do in Neo4j Java driver.

The tracing agent

Thanks to Gunnar I learned about GraalVMs Reflection tracing agent. It can discover most of things described above for you.

Running the only-on-jvm example from the beginning with the agent enabled, it generates the full configuration for us. For this to work, you must of course be running the OpenJDK version of the GraalVM already:

java --version
openjdk 11.0.7 2020-04-14
OpenJDK Runtime Environment GraalVM CE 20.1.0 (build 11.0.7+10-jvmci-20.1-b02)
OpenJDK 64-Bit Server VM GraalVM CE 20.1.0 (build 11.0.7+10-jvmci-20.1-b02, mixed mode, sharing)
 
java  -agentlib:native-image-agent=config-output-dir=only-on-jvm/target/generated-config -jar only-on-jvm/target/only-on-jvm-1.0-SNAPSHOT.jar
Hello GraalVM from ServiceImpl at 2020-09-16T07:12:27.194185Z
Hello, from a resource.

The result looks like this:

dir only-on-jvm/target/generated-config 
total 32
14417465 0 drwxr-xr-x  6 msimons  staff  192 16 Sep 09:12 .
14396074 0 drwxr-xr-x  8 msimons  staff  256 16 Sep 09:12 ..
14417471 8 -rw-r--r--  1 msimons  staff  278 16 Sep 09:12 jni-config.json
14417468 8 -rw-r--r--  1 msimons  staff    4 16 Sep 09:12 proxy-config.json
14417470 8 -rw-r--r--  1 msimons  staff  226 16 Sep 09:12 reflect-config.json
14417469 8 -rw-r--r--  1 msimons  staff   77 16 Sep 09:12 resource-config.json

Looking into the reflect-config.json we find a less coarse version of what I used above:

[
{
  "name":"ac.simons.native_story.Service",
  "methods":[{"name":"getGreetingFromResource","parameterTypes":[] }]
},
{
  "name":"ac.simons.native_story.ServiceImpl",
  "methods":[{"name":"<init>","parameterTypes":[] }]
}
]

The configuration is in fact complete in my example, as none of the dynamic method calls depend on input. If input varies the method calls, the agent has ways of merging the generated config.

In anyway, the agent is a fantastic tool to get you up and running with a base configuration for your libraries native config.

Quintessence

Without much effort I can make up a framework or program that is not exactly a good fit for a native binary. Of course, those examples here are contrived but I am pretty sure a couple of things I did here are to be found in many many applications still written today.

Also, reflection is used a lot in frameworks like Spring-Core, Hibernate ORM and of course Neo4j-OGM and Spring Data. For DI related frameworks, reflections make it easy to create injectors and wire dependencies. Object mappers don’t have an idea of what people are gonna throw at them.

Some of the things can be solved very elegantly with compile-time processors and resolve annotations and injections into byte code. This is what Micronaut does for example. Or with prebuilt indexes for domain classes like the Hibernate extensions in Quarkus do.

Older frameworks like Spring that also integrate over a lot of other things don’t have that luxury right now.

Either way, the tooling on the framework sides is improving a lot. Quarkus has several annotations and config options that generates the appropriate parameters and things as described above and a nice extension mechanism I described here. Spring will provide similar things through the spring-graalvm-native project. For Spring Data Neo4j the hints will probably look similar to this. In the end: Those solutions will translate to what I described above eventually.

Also bear in mind that there’s more that needs configuration: I addressed only reflection and resources but not JNI or proxies. There are shims and actuators to make them work as well.

I think that all the tooling around GraalVM native images is great and well documented. However, as you can see in my contrived example, there can be some pitfalls, even with applications that may seem trivial. Just pointing the native-image command against your class or jar file is not enough. Your test scenarios for services running native must be rather strict. If they spot errors, there is a plethora of utilities to help you with edge cases.

If you want to have more information, I really like this talk given at Spring One 2020 by Sébastien Deleuze and Andy Clement called “The Path Towards Spring Boot Native Applications” and I think it has a couple of takeaways that are applicable to other frameworks and applications, too:

In the long run, the work we as library authors put into making this things possible will surely pay out. But the benefit that a native image provides for many scenarios is not a free lunch.

| Comments (5) »

15-Sep-20


Hacking with Spring Boot 2.3

A couple of weeks ago, I received a paper copy of “Hacking with Spring Boot 2.3 – Reactive Edition” by Greg L. Turnquist. Greg sent this copy to me free of charge for a review. Thanks for that!

I’m happy about the opportunity to read a new Spring Boot book after I published one myself nearly two years ago (See Spring Boot Buch) about Spring Boot 2.0.

I also have only high regards of Greg. While I work at Neo4j, Inc. and Greg at VMWare we happen to have very similar tasks: We both work at various Spring Data modules and meet regularly at the shared standup.

About the print

Greg chose to self-publish his new book and I can totally relate. My copy came as “print on demand” version from Amazon. The quality is really nice and in no way worse than Greg’s previous book.

I may prefer a more black typesetting, but it’s still readable well enough. Apart from that, you clearly see it’s AsciiDoc based sources 🙂

Lexicon or hands on?

Hacking with Spring Boot 2.3 is definitely a hands on book. After a quick introduction to Spring Boot itself, Greg jumps right away from it 🙂 The focus lies on introduction reactive programming concepts and a very simple kitchen domain.

All the time, it really feels like you are sitting with Greg together on the keyboard, pair programming.

What I like about not doing Spring and Spring Boot related stuff at the very beginning is the mere fact that this is what Spring should be about: Providing the plumbing for your domain around it, not inside it. Having the start designed this way is excellent.

Of course, Greg needs to introduce core Spring Boot concepts at the beginning and we get a good overview about Spring Boot starters, auto configuration, metadata and more.

On data access

The book is about hacking with Spring Boot, not with Spring Data. But I agree 100% with Greg that an application without data is somewhat meaningless. As the book targets reactive programming especially, Greg has to pick a database that supports real reactive drivers, not something wrapped in a thread pool. At the time of writing, MongoDB was the predominant one. I would have of course loved to see SDN/RX and Neo4j, but I guess I cannot have everything.

In the meantime, you can go for Neo4j or with R2DBC and several SQL-Databases (amongst them, PostgresQL).

Anyway, I do think that Greg manages to cover standard idioms and best practices to work with Spring Data based data access code a like. It’s an exhausting topic, but the overview is just right.

On developer tools

Solid content on the “standard” Spring Boot developer tools, like restarting mechanisms and caching. Complete and nothing much to say about. The new logging groups are mentioned.

The information about Project Reactors debug mode, the logging mechanism for reactive assemblies and also the reference to the BlockHound a very valuable, even for a seasoned library developer like myself.

On testing

Testing with Spring Boot is a solid introduction to the testing support. It recaps the differences between unit, integration and end-to-end-tests. It clarifies that Spring Boot (and Spring) always strived for testability, in contrast to other believes.

While I would have probably chose different examples for testing services – for example not firing up the Spring Context at all as long as possible, especially with everything constructor injected as one should do – I super like the stance on reactive testing support. Starting about Project Reactors step verifiers and some more gems:

I learned about to things: Mono#hide respectively the corresponding fact that Project reactor may optimizes empty monos away and about Blockhounds JUnit 5 integration (Remember: Blockhound detects blocking calls in reactive code):

<dependency>
	<groupId>io.projectreactor.tools</groupId>
	<artifactId>blockhound-junit-platform</artifactId>
	<version>1.0.4.RELEASE</version>
	<scope>test</scope>
</dependency>

The above dependency brings in a test execution listener that instruments all running tests. Sweet and short.

Operations with Spring Boot

So must of the Docker and container related stuff in that chapter is brand new Spring Boot 2.3. Spring Boot Actuator has been there forever, but it’s helpful of course for people being new to Boot. Also: Thanks for the reminder to epxose actuator endpoints consciously.

Anyway, I myself found the explanation of how to use Spring Boot 2.3s new layered Jar with layered Docker images and WITHOUT the also possible Buildpack approach very usable.

Rest? Not for the RESTFul!

I wouldn’t be happy having a book by Greg without a good chapter on REST. But of course, I get one: Greg evolves a standard REST controller (Just returning plain JSON) to support HATEOAS to support affordances, all in a reactive way and all accompanied by Spring REST docs test.

A reader must do some deeper dive in some of the junction points afterwards, but they clearly have an idea what is possible.

Subliminal Messages

The most valuable piece of information for me here is the very nice explanation of Project Reactors publishOn and subscribeOn operators as well as the different schedulers revisited.

RSocket 🚀

This chapter makes me want use this link to start.spring.io, add our SDN/RX to it and jump into developing an RSocket proxy to reactive Neo4j repositories.

Especially on the topic of RSocket of which I don’t know yet much, Greg’s approach showing what is possible works very well for me. It gives you an idea and let’s you build from there on.

I personally will do some more reading afterwards on the backgrounds, though and this would of course also be my recommendation (the very same recommendation I have for people after many conference talks: Check the techs background and ideas, before you take conference driven development home and just go with the flow).

“Spring security is a beast”

Well, chapters about security: They are a can of worms. Writing them exposes the same problems that Spring Boot 1.x has had by making educated guesses of how Spring Security should be configured (they changed that later on, nowadays Spring Boot uses Spring Security’s defaults and backs of entirely when one configures a single aspect of it).

Anyway: There’s only so much depth an author can go, and so Greg shows only the basic concepts of Spring Security (for reactive applications).

I guess that in the real world, that chapter will leave the most open questions, for example how to integrate with Keycloak, Kerberos, LDAP or whatever.

As Greg writes about Spring Security’s OAuth2 support, my approach would be applying what you learn there and delegate everything to some IDAM, for example bespoke Keycloak (in contrast of running your own OAuth server based on a Spring Boot Spring Security application).

The main takeaway of that chapter for me is actually some good ideas what I can do once I have an authenticated user in the context.

Verdict

As I said already on twitter:

Greg’s book gives a rock solid overview, both about core Spring and Spring Boot ideas as well as reactive programming paradigms. The later was super valuable for me.

If you want to go more into technical details – why auto configuration or Spring data repositories work – you need to look for a different resource, most possible the great documentations and talks from the Spring team (this one from Madhura) or my own talks or book (given you can read German).

While I work for Neo4j and I find the lack of Neo4j examples in Greg’s book disturbing, I’m gonna recommend it anyway to my colleagues in the field teams. After reading, they will have good ideas what’s in the box and where to dig further.

| Comments (0) »

03-Jul-20


Rewriting and filtering history

In my role as a Spring library developer at Neo4j, I spent the last year – together with Gerrit on creating the next version of Spring Data Neo4j. Our name so far has been Spring Data Neo4j⚡️RX but in the end, it will be SDN 6.

Anyway. Part of the module is our Neo4j Cypher-DSL. After working with jOOQ, a fantastic tool for writing SQL in Java, and seeing what our friends at VMWare are doing with an internal SQL DSL for Spring Data JDBC, I never wanted to create Cypher queries via string operations in our mapping code ever again.

So, we gave it a shot and started modeling a Cypher-DSL after openCypher, but with Neo4j extensions supported.

You’ll find the result these days at neo4j-contrib/cypher-dsl.

Wait, what? This repository is nearly ten years old.

Yes, that is correct. My friend Michael started it back in the days. There are only few things were you won’t find him involved in. He even created jequel, a SQL-DSL as well and was an author on this paper: On designing safe and flexible embedded DSLs with Java 5, which in turn had influence on jOOQ.

Therefor, when Michael offered that Gerrit and I could extract our Cypher-DSL from SDN/RX into a new home under the coordinates org.neo4j:neo4j-cypher-dsl, I was more than happy.

Now comes the catch: It would have been easy to just delete the main branch, create a new one, dump our stuff into it and call it a day. But: I actually wanted to honor history. The one of the original project as well as ours. We always tried to have meaningful commits and also took a lot of effort into commit messages and I didn’t want to lose that when things are not working.

Adding content from one repository into an unrelated one is much easier than it sounds:

# Get your self a fresh copy of the target 
git clone git@wherever/whatever.git targetrepo
# Add the source repo as a new origin
git remote add sourceRepo git@wherever/somethingelse.git
# Fetch and merge the branch in question from the sourceRepo as unrelated history into the target
git pull sourceRepo master --allow-unrelated-histories

Done.

But then, one does get everything from the source. Not what I wanted.

The original repository needed some preparation.

git filter-branch to the rescue. filter-branch works with the “snapshot” model of commits in a repository, where each commit is a snapshot of the tree, and rewrites these commits. This is in contrast to git rebase, that actually works with diffs. The command will apply filters to the snapshots and create new commits, creating a new, parallel graph. It won’t care about conflicts.

Manisch has a great post about the whole topic: Understanding Git Filter-branch and the Git Storage Model.

For my use case above, the build in subdirectory-filter was most appropriate. It makes a given subdirectory the new repository root, keeping the history of that subdirectory. Let’s see:

# Clone the source, I don't want to mess with my original copy
git clone sourceRepo git@wherever/somethingelse.git
# Remove the origin, just in case I screw up AND accidentally push things
git remote rm origin
# Execute the subdirectory filter for the openCypher DSL
git filter-branch --subdirectory-filter neo4j-opencypher-dsl -- --all

Turns out, this worked good, despite that warning

WARNING: git-filter-branch has a glut of gotchas generating mangled history
rewrites. Hit Ctrl-C before proceeding to abort, then use an
alternative filtering tool such as ‘git filter-repo’
(https://github.com/newren/git-filter-repo/) instead. See the
filter-branch manual page for more details; to squelch this warning,
set FILTER_BRANCH_SQUELCH_WARNING=1.

I ended up with a rewritten repo, containing only the subdirectory I was interested in as new root. I could have stopped here, but I noticed that some of my history was missing: The filtering only looks at the actual snapshots of the files in question, not at their history you get when using --follow. As we moved around those files around a bit already, I lost all the value information.

Well, let’s read the above warning again and we find filter-repo. filter-repo can be installed on a Mac for example with brew install git-filter-repo and it turns out, it does exactly what I want, given I know vaguely the original places of the stuff I want to have in my new root:

# Use git filter-repo to make some content the new repository root
git filter-repo --force \
    --path neo4j-opencypher-dsl \
    --path spring-data-neo4j-rx/src/main/java/org/springframework/data/neo4j/core/cypher \
    --path spring-data-neo4j-rx/src/main/java/org/neo4j/springframework/data/core/cypher \
    --path spring-data-neo4j-rx/src/test/java/org/springframework/data/neo4j/core/cypher \
    --path spring-data-neo4j-rx/src/test/java/org/neo4j/springframework/data/core/cypher \
    --path-rename neo4j-opencypher-dsl/:

This takes a couple of paths into consideration, tracks the history and renames the one path (the blank after the : makes it the new root). Turns out that git-filter-repo is also way faster than the git-filter-branch.

With the source repository prepared in that way, I cleaned up some meta and build information, added one more commit and incorporated it into the target as described at the first step.

I’m writing this down because I found it highly useful and also because we are gonna decompose the repository of SDN/RX further. Gerrit described our plans in his post Goodbye SDN⚡️RX. We will do something similar with SDN/RX and Spring Data Neo4j. While we have to manually transplant our Spring Boot starter into the Spring Boot project via PRs, we want to keep the history of SDNR/RX for the target repo.

Long story short: While I was skeptical at first ripping the work of a year apart and distributing it on a couple of projects, I’m seeing it now more as a positive decomposing of things (thanks Nigel for that analogy).

Featured image courtesy of Nathan Dumlao on Unsplash.

| Comments (1) »

01-Jul-20


Die deutsche “Corona-Warn-App” CWA

Im Jahr 2020 passieren einige Dinge, die wohl kaum ein Mensch Ende des vergangenen Jahres hätte ahnen können. Die COVID-19 Pandemie ist es nicht… Führende Stimmen warnten schon lange. Die Pandemie ist allerdings Auslöser für vieles. So auch für die deutsche Variante der aktuell überall erscheinenden Corona-Tracing-Apps, die “Corona-Warn-App” beziehungsweise kurz CWA die nun von SAP entwickelt und in Zukunft von der Telekom betrieben werden wird.

Zu meiner Person: Ich bin seit 20 Jahren Java-Entwickler, Autor des deutschsprachigen Spring Boot Buchs und beruflich in der Open-Source Entwicklung tätig. Bereits Ende März äußerte ich mich sehr kritisch und negativ über mögliche Anwendungen aus Deutschland, ihre Implikationen auf Datenschutz, Anonymität, Verfolgbarkeit und mehr. Generell hat mich das Tempo der Maßnahmen Ende März eiskalt überrascht und auch stellenweise überfordert.

Ganz herzlichen Dank an Daniel, Tim, Michael, André, Jens, Falk und Sandra für das aufmerksame Lesen und das Feedback zu meinen Tippfehlern.

Ich möchte gar nicht lange über den Sinn und Nutzen von “Apps” im “Kampf gegen Corona” diskutieren. Das primäre Ziel dieser Apps ist das Nachverfolgbarmachen von Kontaktstrecken: Welche Person hielt sich für längere Zeit in der Nähe welcher anderen Personen auf? Erkrankt eine der Personen in diesen Kontaktketten, so können alle Personen der Kette informiert werden, dass sie Kontakt mit einer möglicherweise infizierten Person hatten. Die Konsequenzen dessen mögen unterschiedlich ausgeprägt sein, idR. wird es wohl auf eine mehr oder weniger nachdrücklich empfohlene Quarantäne hinauslaufen, gegebenenfalls angeordnete Tests.

Betrachtet werden im folgenden die Quelltexte der Corona-Warn-App. Genauer gesagt die in der Programmiersprache Java geschriebenen und mit dem Spring Framework umgesetzten Bestandteile des Backends.

Gastvorlesung an der FH-Aachen

Am 15. Juni durfte ich einen Gastvortrag an der FH-Aachen zum Thema Corona-Warn-App halten. Dieser wurde auf Youtube veröffentlicht:

Tracking oder tracing, zentral oder dezentral?

Tracking bezeichnet hier die Nachverfolgung einzelner Benutzer, durch regelmässiges Speichern des Aufenthaltsortes über die GPS-Daten eines unterstützten Smartphones. Tracking erfolgt in der Regel zentral: Individuelle Spuren einzelner Personen entstehen. Auch wenn viele Menschen dies täglich durch die Nutzung sozialer Medien mit aktivierten Ortungsdiensten tun, gewinnt es in den Händen des Staates noch einmal eine andere Bedeutung. Werden wir immer in einer Demokratie leben?

Daher wird in den Leitlinien der Europäischen Union zur Gewährleistung der uneingeschränkten Einhaltung der Datenschutzstandards durch Mobil-Apps zur Bekämpfung der Pandemie auch explizit von zentraler Speicherung der Standortdaten von Personen abgeraten:

Begrenzte Nutzung personenbezogener Daten: Die Apps sollten den Grundsatz der Datenminimierung einhalten, dem zufolge ausschließlich erforderliche personenbezogene Daten verarbeitet werden dürfen und die Verarbeitung auf das für den jeweiligen Zweck notwendige Maß beschränkt ist. Die Kommission ist der Ansicht, dass Standortdaten für die Ermittlung von Kontaktpersonen nicht erforderlich sind und dafür auch nicht verwendet werden sollten.

Datensicherheit: Die Daten sollten auf dem Gerät der betroffenen Person gespeichert und verschlüsselt werden.

Was ist die Alternative? Die Firmen Apple und Google haben sich auf ein Verfahren geeinigt, dass das sogenannte Decentralized Privacy-Preserving Proximity Tracing (DP3T) für Smartphones mit aktuellen iOS beziehungsweise Android-Betriebssystemen über Bluetooth umsetzt.

Im Detail beschrieb Heise.de die Funktionsweise unter dem Titel: Corona-Tracking: Wie Contact-Tracing-Apps funktionieren, was davon zu halten ist bereits im April.

Die Kurzform des ganzen ist ungefähr diese:

  • Die Telefone generieren alle 24 Stunden einen temporären Schlüssel (TEK) und verschlüsseln diesen und speichern ihn auf dem Gerät.
  • Aus diesem TEK werden weitere Schlüssel (RPIK) erzeugt, und zwar rollierend. Mit diesen werden Identifizierungsmerkmale generiert (Ephemeral ID beziehungsweise EphID genannt). Diese werden über Bluetooth abgestrahlt
  • Aus den EphIDs kann nicht der TEK ermittelt werden beziehungsweise nicht das Gerät, dass die Schlüssel abgestrahlt hat
  • Andere Geräte fangen diese EphIDs auf und speichern diese ebenfalls lokal
  • Wird eine Benutzerin positiv auf COVID-19 getestet, so kann sie das in der App eingeben. Zu diesem Zeitpunkt werden die TEKs der letzten 14 Tage auf einen zentralen Server hochgeladen und von dort an als “Diagnose Schlüssel” bezeichnet. Ein Rückschluss auf die erkrankte Person ist nicht möglich, da die ursprünglichen TEKs alle 24 Stunden neu generiert werden.
  • Der zentrale Server wird nun nach Prüfung den Diagnose Schlüssel an alle teilnehmenden Smartphones ausstrahlen. Diese Geräte können die gesammelten und lokal gespeicherten EphIDs von anderen Geräten, die in der Nähe waren, nun entschlüsseln, wenn diese ursprünglich mit dem TEK des diagnose Schlüssels verschlüsselt wurden. Ist dies der Fall, weiß die Benutzerin des Smartphones, dass sie – oder ihr Gerät – in der Nähe eines Smartphones war, das einer infizierten Person gehört

Die CWA braucht also mindestens folgende Bestandteile:

  • Schnittstellen zum Betriebssystem moderner Smartphones: Diese stellen Apple und Google bereit.
  • Ein Frontend dazu. Das, was allgemein in diesen Zeiten als “App” betrachtet wird.
  • Ein Backend, das mindestens Komponenten enthält, die TEKs entgegen nehmen, verifizieren und anschließend an Teilnehmern des Systems ausstrahlen

Eine Komponente, die eine persönliche Anmeldung eines Benutzers am System enthält ist ausdrücklich nicht notwendig.

In Deutschland werden die letzt genannten Komponenten von einem Konsortium der Deutschen Telekom und SAP entwickelt und das als Open Source Anwendung, vollumfänglich verfügbar auf Github als Corona-Warn-App, inklusive der Projektdokumentation. Wie gesagt, eines der Dingen, die 2019 sicherlich höchst unwahrscheinlich waren.

Meine persönliche Meinung: So wie es aktuell rund 80 Millionen Virologen und Epidemiologen gibt, soviel Softwareexperten mit einer Meinung sind zu erwarten (ich sollte noch mal auf mein Buch aufmerksam machen, kauft es, es ist sehr gut!): SAP und Telekom haben in diesem Umfeld wenig zu gewinnen: Es ist anzuerkennen und trägt für mich sehr zum Vertrauen in eine solche App bei, dass eine offene Entwicklung zumindest versucht wird, und das angefangen bei der wirklich guten Projektdokumentation, Softwarearchitekturbeschreibung, den Epics und Whitepapers, den Apps für iOS und Android sowie dem Quelltext des Servers, mit dem die Apps sprechen und dem Verifikationsserver.

Ich habe keine Expertise in der Anwendungsentwicklung für iOS beziehungsweise Android. Daher verweise ich für dieses Thema auf das Review von Roddi: Review der App, die Endanwender sehen.

Softwarearchitektur

Wir finden die relevante Softwarearchitektur in der Dokumentation unter Solution Architecture (Architektur der Lösung). Ich benutze dieselben Grafiken wie das CWA-Projekt, die unter Apache 2 License veröffentlicht wurden:


Oben links sehen wir die Komponenten auf dem Gerät der Nutzer: die CWA. In der “Open Telekom Cloud” sehen wir alle Serverkomponenten, die im folgenden weiter enthüllt werden:


Diese Dokumente sprechen sicherlich nicht jeden Menschen an, für mich sind sie sehr aussagekräftig und genau richtig detailliert. Sie ermöglichen einen schnellen Zugang zu den Komponenten des Systems. Ich halte Zugänglichkeit in diesem Fall für essentiell!

Ich werde im folgenden die Komponenten “Corona-Warn-App-Server” (dieser nimmt die TEK infizierter Personen entgegen) und den “Verification Server” (dieser verifiziert die Infektion einer Person, die diese in die App einträgt, mit dem “Test Result Server”, auf dem die Daten des Gesundheitsamtes gespeichert sind) unter dem Standpunkt des beschriebenen Verfahrens betrachten und analysieren, ob mehr Daten als versprochen gespeichert werden oder nicht und ob offenkundige, grobe Schnitzer gemacht wurden.

Der Corona-Warn-App-Server

Update vom 3. Juni: Auf Twitter entsteht eine spannende Diskussion über das eigentliche Datenmodel selber: Thread sowie insbesondere meine Antworten und diese darin. Hier gibt es grundsätzlich 2 Bedenken: “Bleibt das DB Setup so in Produktion?” (Wenn ja, da stimme ich Alvar zu, wäre das schlecht), “Sollte so modelliert werden?” (vor diesem Commit hätte ich gesagt, ist nicht brilliant, aber ok… Die Änderungen danach sind so mittelgeil. Es wird gehofft, dass die “keys of infected user” aus dem Übertragungsprotokoll unique genug sind, um als Primary Key zu dienen und falls doch nicht, saveDoNothingOnConflicty YOLO. Also ich hätte das schon gern gewusst, wenn eine App-Instanz das Backend mit duplicate keys flutet.

Erste Frage: Wie ist es um Vollständigkeit und Inbetriebnahme bestellt? Mein erster Gedanke bei den umsetzenden Unternehmen wäre ein komplexes Enterprise-Deployment, mit Application-Server, Portalservern und mehr gewesen. Klassisches Java EE halt. Ich wurde positive von mehreren Java basierten Spring Boot-Anwendungen überrascht. Die Zielplattform der Anwendung ist Kubernetes, ebenfalls eine Lösung zur Automatisierung der Bereitstellung, Skalierung und Verwaltung von Anwendungen in sogenannten Containern. Kubernetes ist ebenfalls Opensource und wird im Fall der CWA in OpenShift betrieben. OpenShift verwaltet Rechenressourcen in privaten und öffentlichen Clouds.

Kann ich den Server lokal bauen und kompilieren, Java und das Buildtool vorausgesetzt?

Kurz: Ja!

> cwa-server git:(master) ./mvnw clean verify
[INFO] Reactor Summary for server 0.5.3-SNAPSHOT:
[INFO] 
[INFO] server ............................................. SUCCESS [  1.301 s]
[INFO] common ............................................. SUCCESS [  0.066 s]
[INFO] protocols .......................................... SUCCESS [  4.354 s]
[INFO] persistence ........................................ SUCCESS [ 11.746 s]
[INFO] services ........................................... SUCCESS [  0.326 s]
[INFO] distribution ....................................... SUCCESS [ 14.035 s]
[INFO] submission ......................................... SUCCESS [ 13.675 s]
[INFO] ------------------------------------------------------------------------

Find ich erstmal gut. Das Readme beinhaltet Anweisungen, wie das ganze Dingen in Betrieb genommen werden kann, die Stand 31. Mai auch funktionieren. Ein herzhaftes `docker-compose up` bringt hervor:

80/tcp                    pgadmin_container
0.0.0.0:8000->8080/tcp, 0.0.0.0:8006->8081/tcp   cwa-server_submission_1
0.0.0.0:8001->5432/tcp                           cwa-server_postgres_1
0.0.0.0:8003->8000/tcp                           cwa-server_objectstore_1
0.0.0.0:8004->8004/tcp                           cwa-server_verification-fake_1

Der submission-server

Basiert auf Spring Boot 2.3, dem aktuellsten Release. Die Wesentliche Abhängigkeiten sind spring-boot-starter-web sowie spring-boot-starter-security sowie Spring Boot Actuator und Micrometer und die Prometheus Anbindung. Mit den letzt genannten Komponenten können Metriken (u.a. Performance etc.) offen gespeichert werden.

Im commons befinden sich sowohl die implementierten Protokolle auf Basis von Protocol buffers als auch die Datenbankschicht.

Letztere setzt auf auf eine relationale Datenbank: Postgres. Ich halte das für eine vernünftige als auch transparente Wahl.

Gespeichert wird tatsächlich nur das, was im eingangs beschriebenen Prozess notwendig ist: Der zum Diagnosis Key erhobene Temporary Exposure Key.

Am Code selber gibt es einiges, dass ich persönlich nicht als “Best-Practices” sehen oder gar empfehlen würde. Wenn schon explizite `@EnableXXX` Konfiguration, dann richtig: Manuelle Auflistung aller Spring-Komponenten, um im Zweifelsfall sicher davor zu sein, dass eine Bibliothek über automatische Konfiguration unerwünschte Komponenten registriert. Vollständig irritierend finde ich die Suche nach Servlet-Komponenten: Zumindest im Sourcecode finde ich keine zusätzlichen Komponenten, die nicht bereits so gefunden werden würden. Lässt die Frage offen, ob die final paketierte App gegebenenfalls weitere Libraries beinhaltet.

Die Testabdeckung ist auf den ersten Blick gut, mit entsprechenden Mocks der Downstream-Services ist der Submission-Controller testbar.

Die Dokumentation lässt leider offen, was es mit dem numerischen, erforderlichen Header cwa-fake auf sich hat. Ich vermute er dient zum Testen der Apps. Ich würde dazu raten, diesen Code Bereich im Controller in Produktion zu entfernen.

Von Johannes kam der Hinweis auf die Stelle der Dokumentation, die ich übersehen habe: Fake Submissions:

In order to protect the privacy of the users, the mobile app needs to send fake submissions from time to time. The server accepts the incoming calls and will treat them the same way as regular submissions. The payload and behavior of fake and real requests must be similar, so that 3rd parties are unable to differentiate between those requests. If a submission request marked as fake is received by the server, the caller will be presented with a successful result.

Das Ziel der Übung ist, “weißes Rauschen” zu Erzeugen. Sowohl in Bezug auf die Requests selber, als auch in Bezug auf die Antwortzeiten (Das kann gegen Timing-Angriffe schützen.

Der distribution Service

Die Aufgabe dieses Service ist die Verteilung bestätigter Diagnose Keys an sogenannte CDNs: “Content delivery networks”. Das sind speziell auf die Auslieferung von statischen Inhalten ausgelegte Dienste, die das in der Regel sehr schnell und sehr zuverlässig tun und die oftmals auch speziell auf Regionen ausgeprägt werden können.

Ebenfalls setzt dieser Service die Anforderung um, dass gespeicherte Diagnosis Keys nach 14 Tagen gelöscht werden.

Der distribution Service ist schlussendlich ein Kommandozeilen-Programm. Er muss von außen orchestriert werden. Nach Start werden alte Schlüssel gelöscht (die SQL-Abfrage ist nachvollziehbar und in Form eines Spring Data Repositories implementiert), alle neuen Schlüssel zusammengestellt und anschließend in einem S3 kompatiblen Cloud-Speicher gespeichert. In Produktion wird dieser in der in Deutschland gehosteten Telekom-Cloud liegen, im Test ist es ein “Zenko/Cloudserver”, der lokal in Docker gestartet werden kann. Optional werden Debug / Testdaten generiert. Danach endet das Progrmam.

Auf den ersten Blick fand ich die Entscheidung seltsam und hätte einen dauerhaft laufenden Service gewählt und die Prozesse mit den Mitteln des Spring-Frameworks gesteuert… Im Zweifelsfall mit den entsprechenden @Schedule-Annotationen. Metriken würden dabei ebenfalls automatisch anfallen und gesammelt werden können.

Ich kann nicht beurteilen, ob die andere Entscheidung besser ist. Sie erfordert auf jeden Fall weitere Konfiguration in der Kubernetes-Zielplattform um den Dienst anzustoßen.

Die Testabdeckung ist auf den ersten Blick gut.

Zwischenfazit zum Warn-App-Server

Es gibt vieles, das ich persönlich im Corona-Warn-App-Server anders machen würde. Aber ist er grundsätzlich “kaputt” oder unsicher? Sicherlich nicht. Die Architektur ist gut dokumentiert und an einem Sonntagnachmittag nachvollziehbar. Das ist gut: Übermässige Komplexität erhöht Fehlerwahrscheinlichkeiten oder schafft Lücken, Dinge zu verstecken.

Der Server speichert keine weiteren Daten als die notwendigen. Es wäre interessant, die Konfiguration der Orchestrierung des ganzen für die Produktionsumgebung zu sehen. Wird die PostgreSQL Datenbank on-disk verschlüsselt? Wird sie gegebenenfalls repliziert? Wie sind die Object-Stores geschützt?

Der Corona-Warn-App Verification Server

Die Verifikation eines Benutzers, der seine Erkrankung und das Testergebnis an die App melden möchte, erfolgt mit Hilfe eines TAN-Verfahren. Der Datenfluss ist in Solution Architecture detailliert erklärt. Wichtig ist hier, dass der Verification Server keine personenbezogenen Daten speichert. Er nutzt zur Bestätigung des Test einen weiteren Dienst. Diesen habe ich nicht angeschaut.

Die Liste der Abhängigkeiten des Verification Servers ist deutlich größer: Von Lombok an angefangen über Guava zu OpenAPI UI und zum Feign-Client zur deklarativen Anbindung von Webservices. Gut, der Labserver hätte auch anders angebunden werden können… Aber passt schon.

Der Service speichert – ebenfalls in einer PostgreSQL-Datenbank – eine “AppSession” sowie die empfangenen TANs.

Warum der Verification Server Liquibase und der Warn Server Flyway zur Datenbankmigration nutzt? Unklar. Vermutlich unterschiedliche Teams.

Auch hier werden keine Daten gespeichert, die direkt oder einfach einer Person zugeordnet werden können, das Prinzip der Datensparsamkeit wird beachtet.

Fazit

Wer ein “Domain Driven Design”-Leuchtturm-Projekt erwartet, ist an der falschen Stelle. Die von mir betrachteten Services sind sicherlich keine hervorstechenden Projekte, die durch die Bank Best-Practices zeigen. Aber sie sind solide, gut zugänglich, vollumfänglich dokumentiert und insbesondere frei von künstlerischen Kapriolen. (der Art “Lass mal eigenen Schlüsselmechanismus bauen oder einen eigenen Persistenzlayer”).

Das Decentralized Privacy-Preserving Proximity Tracing (DP3T) Konzept wirkt für mich schlüssig, die implementierten Backend-Services speichern erstmal nur die notwendigen Daten um den eingangs erklärten Prozess zu unterstützen.

Einige Fragen habe ich bereits im Text gestellt. Reproducible Builds und Nachvollziehbarkeit, wer wann welchen Build deployed hat sind noch zu ergänzen.

Während ich die “Datenspende-App” des Robert-Koch-Instituts für eine Katastrophe halte (sowohl von der Umsetzung und des Timings im April, siehe hier und hier), würde ich die Corona-Warn-App des Landes wahrscheinlich nutzen. Meine größte Sorge wäre Stand heute vermutlich der Stromverbrauch und in zweiter Hinsicht, der Nutzen: Was passiert, wenn ich in Kontakt mit infizierten Personen kam? Das System ist so ausgelegt, dass der Server nicht weiß, wer ich bin. Es setzt also auf den gesunden Menschenverstand derjenigen, die gewarnt werden. Dass die gegebenenfalls in Quarantäne gehen, Kontakte wieder vermeiden. Mehr nicht. Vielleicht wäre es sinnvoll, eine Warnung direkt mit einem kostenlosen Test-Coupon zu verschicken.

Am Ende darf also bezweifelt werden, dass es eine technische Lösung für die Corona-Pandemie gibt. Jürgen Geuter aka tante, den ich sehr schätze, schrieb bereits im April, ob diese Apps nötig sind.. Ich halte den Artikel nach wie vor für lesenswert, über Technologie hinaus. Ebenfalls sehr lesenswert, jedoch auf Englisch, ist der folgende Text: The long tail of contact tracing (societal impact of CT).

| Comments (0) »

31-May-20